Last Updated on June 21, 2024 by Dan Campbell
If you’re interested in converting your natural gas (also referred to as NG) appliances to propane (also referred to as LP, LPG, or Liquid Propane), or your propane appliance to natural gas, such as a bbq grill or gas range, chances are you can. Luckily, a lot of appliances are able to be converted between the two fuel types, and some will even come with the parts to do so.
Converting your appliance between the two fuels can be as simple as installing a conversion kit, whether that came with your appliance when you purchased it, or a third-party conversion kit you purchase. Sometimes, however, you may need to manually modify parts to convert the fuel system, which can be a bit tricky if you’re not familiar with gas systems. The main things you’ll be changing or adjusting are the regulator, the orifices, and the air shutters. I’ll explain more about each of these parts below.
In this guide, I will explain the general steps of what you need to do to convert your appliance from natural gas to propane or vice versa. You should always follow the exact instructions for your appliance or review the owner’s manual that came with your appliance.
Because every appliance is different, it’s impossible to give one solution to fix them all. My goal with this post is to inform you about how the general process works and to make sure you are comfortable with the steps if you decide to make the modification. For the most part, I will be referencing bbq grills as that is the most common appliance being converted, however, this also applies to other appliances that use natural gas or propane.
Can My Appliance Be Converted? (Grills, Ovens, etc.)
Most appliances that use natural gas or propane can be converted to use one or the other. Most appliances should come with the required parts to make the switch, however, you can purchase conversion kits if yours did not. It’s important to first make sure your appliance can use both fuels.
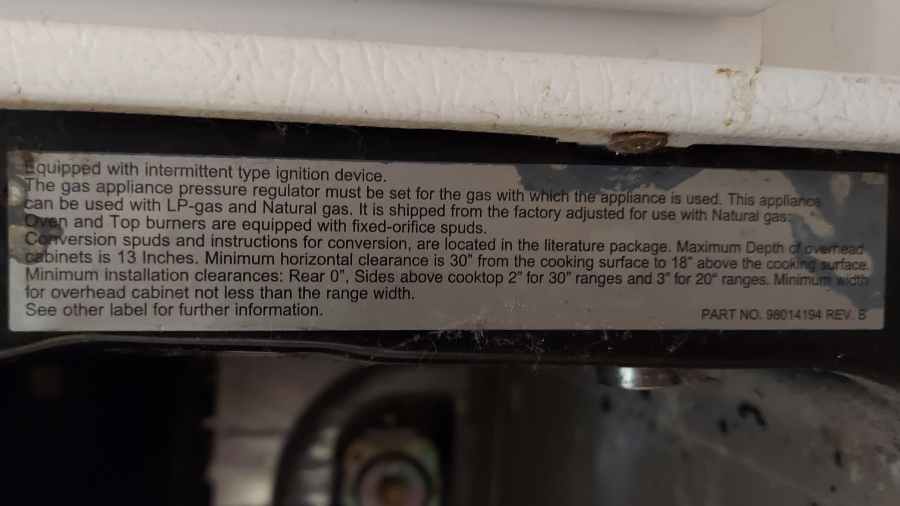
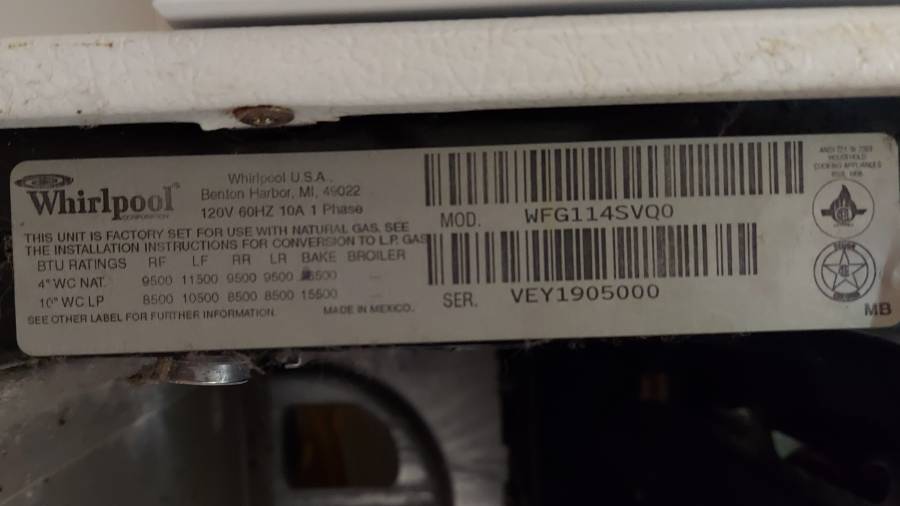
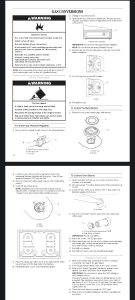
You will first want to look for instructions on the appliance, sometimes the instructions are on the inside of a door, or on the back near where the gas line is connected. Sometimes the parts will also be secured to the appliance in an inconspicuous location, such as behind the broiler drawer in some ovens, typically in a bag that contains instructions as well. Below are pictures of my oven which can be converted between both propane and natural gas.
If you cannot find the instructions on your appliance, search for the model number online or call the manufacturer to get the instructions/owner’s manual. It is crucial to follow the exact instructions for your specific appliance to avoid injury or damaging the appliance, as each appliance may require specific steps in order to function properly.
Can Natural Gas Appliances Run on Propane?
Technically yes, natural gas appliances can sometimes operate when connected to propane but it is a bad idea. Because propane runs at a higher pressure than natural gas and produces more BTUs (almost twice as much BTU for the same amount of gas), running a natural gas appliance on propane without converting the system can create issues. Because the appliance was designed for natural gas, it will deliver too much propane and create a larger flame that is more difficult to manage, as well as burn improperly and less efficiently.
If you have a natural gas appliance but want to use propane, it is crucial you convert the appliance to run on propane.
Why Convert Natural Gas Appliances to Propane or Vice Versa
Depending on where you live, converting your appliance to propane may be more beneficial or even required for your situation. If you’re living off-grid and do not have a natural gas line connection, you’ll want to make sure when purchasing appliances that they are capable of running on propane or can be converted to use propane.
And same for propane appliances, if you’re living in a house with a natural gas line, it may be more beneficial to convert your bbq grill to use natural gas over propane so you’re no longer having to purchase propane tank refills or worry about running out of gas in the middle of cooking.
The decision to convert your appliance to either natural gas or propane really comes down to convenience and necessity, as well as long-term costs. With a natural gas connection, you can potentially save money over the course of the appliance’s life, however, you are restricted to only using the appliance where it can be connected. With propane, you have the freedom to move the appliance anywhere, however, you may have higher costs to operate over time. Some people also say they can taste a difference between food cooked on a natural gas bbq vs a propane bbq. (Those people are lying)
Steps to Converting Your Appliance
Below are the general steps needed to convert your natural gas appliance to propane. I’ll go over each of the parts that need to be replaced/adjusted in more detail in the next section, as well as details about conversion kits that are available.
- Turn off all valves and disconnect the current gas source from the appliance
- Adjust the regulator for the new fuel type if required (usually ovens)
- Remove old orifices and install new ones
- Connect the hose from the fuel source to the appliance
- Test the connections for leaking. I highly recommend using this Gas Leak Detecting Spray you can get from Amazon that detects gas leaks, it’s easy to use and gives you peace of mind.
- Adjust the air shutters as desired, the flame should be mostly blue with white tips and steady.
You may need to perform some additional steps, however, those are the general steps required to convert your appliance to a different fuel source.
Additional steps (optional)
- Adjust the pilot light. Since the new fuel is higher pressure, you may need to adjust the pilot light. This is common for Ovens.
- Install a carbon monoxide detector. It’s always a good idea to have a carbon monoxide detector in your home, and if you’re making changes to the fuel source of an indoor appliance it’s smart to have a device that can detect a leak. Be aware that CO2 detectors do not detect propane leaks.
- Adjust flame controls. Some appliances will need to be fine-tuned to produce a proper flame, it might be a small screw near the orifices or near the temperature valves.
Now, while these steps are generally what you will need to do to convert your appliance from either natural gas or propane, you will need to find the instructions for your specific appliance as certain steps may be different or require specific adjustments. For example, some oven ranges will require you to turn a few screws an exact amount of rotations to adjust for the new fuel type. Always refer to your owner’s manual before modifying your appliances, and make sure you are comfortable performing the modifications.
What You’ll Need To Convert Your Natural Gas Appliance to Propane
In order to convert your natural gas appliance to propane, or vice versa, you will need to replace a few parts or make adjustments to the ones on your appliance. Typically the parts you will need to replace or adjust are the regulator, the orifices, the air shutters, and the hose. Some appliances will come with the required parts to do this. If it did not, you may be able to purchase one online, and lastly, if you cannot find one online you can attempt to manually convert it. I’ll go over the options below, as well as explain in a little more detail about each part that you’re replacing or adjusting.
Natural Gas to Propane Conversion Kits
Typically, your appliance already has the required parts attached to convert the fuel source from natural gas to propane. If your appliance did not come with the required parts, you’ll need to purchase a conversion kit for your appliance. For the most part, you’ll need to search your specific appliance and model to find the one you need. You can usually find these directly from the manufacturer, or you can find third-party ones on Amazon that are compatible. For example, if you have a Charbroil Grill with dual-fuel capabilities, you can use this conversion kit to convert your bbq to use natural gas.
Weber grills for example do not come with conversion kits and Weber does not offer conversion kits for any of their grills. All Weber grills are built to use only one specific type of fuel, and the control valves internally are specific to that fuel type. Installing a conversion kit on your Weber grill will void your warranty as well. However, if you decide you still want to convert your Weber grill, you can find third-party conversion kits available online. An example is this Natural Gas to Propane Conversion Kit for Weber natural gas grills, you’ll just need to make sure your model is listed. Be aware though that this only changes the orifices, and not the control valves.
Weber has this to say about converting their gas grills:
However, due to safety considerations, the complexity of the technology and gas train components, as well as the level of disassembly required, we don’t allow conversions or provide conversion kits. Converting a grill will actually void the warranty on the unit and might create an unsafe situation. – weber.com
So even though you can find third-party conversion kits available online, it is not usually recommended for Weber grills as it voids the warranty and can create unnecessary danger if done incorrectly. The safer, and better route for Weber grills is to replace the entire grill’s manifold. Since Webers are designed for one specific fuel type, the manifolds are designed to work specifically with either natural gas or propane. So in order to use natural gas with a Weber grill that was originally designed to use propane, purchasing a natural gas manifold for the same model is the best option. This is more expensive than purchasing a conversion kit and they can be a lot harder to find but it reduces the chances of you running into issues. For example, if you have a Weber Spirit II E-210/S-210 you can purchase this Natural Gas Manifold or this Propane Gas Manifold on Amazon that will replace everything for you.
While this might be the case for Weber, other manufacturers do provide conversion kits, such as Charbroiler and Blackstone. You can buy Blackstone branded conversion kits online to convert your propane griddle to natural gas, however, not all models can be converted so you’ll need to make sure yours can before you purchase one. You can find out if your Blackstone griddle is compatible here.
If you cannot find the specific conversion kit, and you’re comfortable with manually converting your appliance, you can buy generic conversion kits that come with either certain-sized orifices or orifices that are designed for you to drill the correct size hole into, depending on the BTU requirements for your appliance. You will need a micro drill bit set to be able to drill the exact size hole you need for your application, I recommend starting with two sizes smaller than the final size you need and work your way up.
Parts That You Will Need to Replace or Adjust
Below are the various parts of your gas appliance that you will need to either replace or adjust. You’ll need to follow the instructions on your specific model to correctly convert your appliance, however, I wanted to give you a general idea of what parts you’ll be messing around with. As I mentioned earlier, the typical parts you will need to replace or adjust are the regulator, the orifices, the air shutters, and the hose.
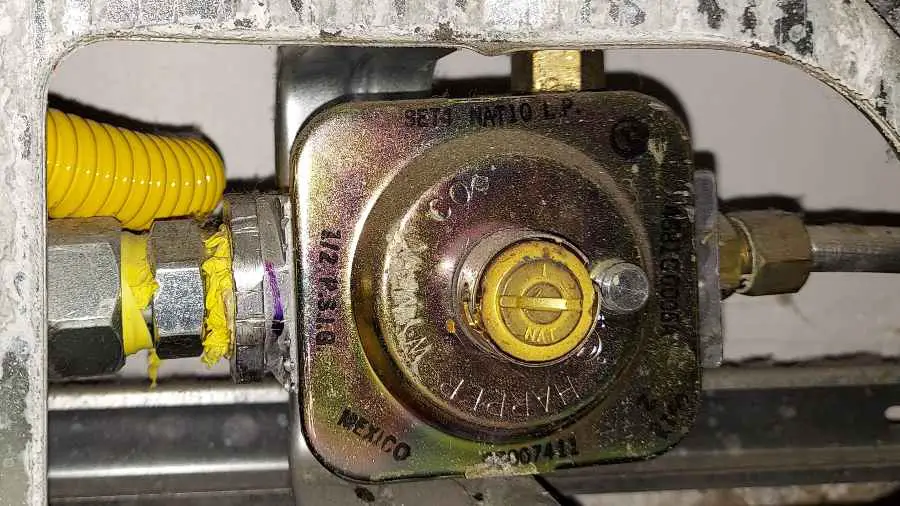
Adjusting The Regulator
The regulator regulates the pressure of gas coming into the appliance, since natural gas and propane operate at different pressures (NG is typically between 3-7WC* and LP is 11WC*), you will need to make an adjustment to your appliance’s regulator. For ovens, this is usually on the bottom and requires you to take out a screw with a reversible part inside. When facing one direction, it will correctly regulate pressure for natural gas, and when flipped around it will regulate the pressure for propane. For more information on WC, check out my article on PSI to WC to get a better understanding.
*WC stands for Water Column, or how much pressure the gas is under
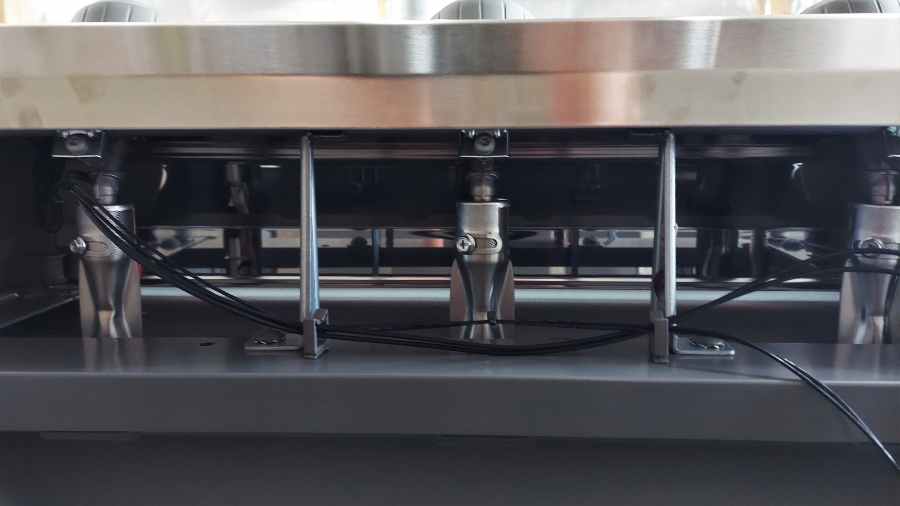
Replacing The Orifices
This is presumably the most cumbersome and technical aspect of converting an appliance to use a different type of gas. The orifice is a small metal “cap” that connects to the gas supply and has a tiny hole in the middle that allows just the right amount of fuel to combine with air inside a burn tube, where combustion occurs. If the hole of the orifice is too large or too small, it can produce a flame that is too large or small, as well as burning inefficiently. Having the incorrect orifice size installed can produce long-term problems such as a blockage caused by soot, or issues with the flame when operating. Orifices are specifically designed to a certain level of precision depending on the BTU requirements and operating pressure. You can use an orifice-sizing chart to determine what size orifice your appliance needs depending on BTU output. I will expand on this below.

Adjusting the Air Shutters
The air shutters are simply covers over the burn tube that allows air into the burn tube where it will mix with gas to combust. Depending on the fuel source you are using, you will need to adjust how much air is being mixed into the burn tube to ensure an optimal ratio of air to gas. Typically, you’re just loosening a screw, adjusting the cover, and testing it out until the flame looks correct. You can tell when you need to adjust the air shutters when the flame is weak or not burning optimally. You can tell when a flame is weak because instead of a blue flame with white tips, you’ll see large orange flames coming out of the burners.

Replacing the Gas Hose
The gas hose is simply the hose that runs from either your wall where it is connected to a natural gas line, or from a propane tank to your appliance. When you purchase a conversion kit, they will likely come with the appropriate hose. Each natural gas and propane require a different hose, as well as being properly sealed. You can find hoses that work with both, such as this NG/LPG Quick Connect 12ft Hose that features a changeable connector so that it can work with either natural gas or propane. You will still need a regulator to use that hose with LPG. Rectorseal 5 is a great option for a sealant, but make sure you are only using this for connections between the hose. It is essential that you use the proper hose as well as sealants for the gas you are trying to work with.
Orifice Sizing Chart
If you’re not sure what size orifice holes you need for your appliance, you will need to calculate what size orifice hole you need. In order to determine what size orifice hole you need to buy or drill into a blank, you can reverse search by either knowing the BTU output of your appliance or by locating the current orifices and finding out what size they are. Typically the size of the orifice will be imprinted on the side of it. You can find examples online, this one is from Sinclair Supply Ltd.

For example, using the chart above, assume you have an appliance that has 4 orifices (one for each burner), and each one is stamped 70 (this is the drill size), and the appliance is running on propane, using the chart you can determine the appliance is using 21,904 BTUs/hr (4*5,476). If you were to convert this appliance to natural gas, you would just drill new holes in the orifices that will allow a similar amount of BTUs/hr. In this example above, let’s say your new system will use natural gas at a pressure of 7WC, you would need to drill new holes that measure 60. This is because at 7CW, a size 61 orifice will produce 5,461 BTU/hr for each orifice, and since there are 4 orifices, the total output will be 21,844 which is the closest without going over the original BTU/hr.
Once you know what orifice size you need, you can find a conversion kit online that contains that size orifice, or you can purchase just the orifices that size. You can also purchase orifices with pre-drilled holes that are smaller than what you need and using a micro drill bit set, you can drill your own holes to fit your specific requirements.
Conclusion
In closing, converting natural gas appliances to propane (and vice-versa) can be a practical and cost-effective solution for many households. To recap the main points covered in the article:
- Understanding the Differences: Recognizing the distinct properties of natural gas and propane is essential. Propane has a higher energy content and requires specific adjustments for appliances designed for natural gas.
- Safety Precautions: Emphasizing the importance of safety, from turning off the gas supply to ensuring proper ventilation, is crucial in preventing accidents.
- Conversion Kit Requirements: Knowing which conversion kit to use, based on the appliance and manufacturer’s specifications, ensures a smooth conversion process.
- Step-by-Step Process: Following a clear, step-by-step guide, from preparing the appliance to testing for leaks, helps in achieving a successful conversion.
- Testing and Adjustments: Ensuring the appliance functions correctly post-conversion by checking for leaks and making necessary adjustments is vital for safety and performance.
Choosing to convert natural gas appliances to propane involves weighing potential benefits such as energy efficiency, cost savings, and the flexibility of using propane in off-grid locations. However, it also requires careful consideration of the potential consequences, including the need for proper equipment and adherence to safety guidelines.
Some Final Tips:
- Always consult the appliance’s manual and the manufacturer’s recommendations before starting the conversion.
- If unsure about any step, consider hiring a professional to ensure the conversion is done safely and correctly.
- Regularly inspect and maintain converted appliances to ensure they operate efficiently and safely.
- Be aware of local regulations and codes that may affect the conversion process.
By following these guidelines and considering all relevant factors, you can confidently convert your natural gas appliances to propane, ensuring they operate safely and efficiently in your home.
I hope this article on converting your appliance to use natural gas or propane has been useful, and please feel free to reach out with any questions, concerns, or comments.
Thank you for reading and God Bless!


