Converting Water Column (WC) to Pounds per Square Inch (PSI) is very straightforward. You may need to reference these two measurements when working with gas appliances or other equipment, such as water pumps.. I’ll go over both types of measurements as well as include the formula to calculate the conversion below. I’ve also created a calculator, as well as included a simple chart that shows some of the standard measurements you might run into.
It’s important to know the conversion of WC to PSI especially when using equipment that is moving liquid or gas a vertical distance, such as a water pump sending water from a low-pressure source to a higher location. While the pump may be measured in PSI, knowing the WC equivalent will help you determine the height it can achieve. Or similarly, if you know the height of a structure you can calculate what PSI pump you need to move water vertically and achieve a specific PSI at the outlet.
Below is a simple calculator for figuring out the conversion of PSI to WC.
PSI to WC
Enter either a PSI or WC value to convert the unit.
PSI to WC Chart
Below is a chart of some of the common measurements you might need to calculate.
Water Column (WC)
Pounds per Square Inch (PSI)
1
0.036
2
0.072
3
0.108
4
0.144
5
0.180
6
0.217
7
0.253
8
0.289
9
0.325
10
0.361
11
0.397
12
0.433
13
0.469
14
0.505
15
0.541
What is Water Column? (WC)
A water column is a unit of measurement that measures pressure and is typically used with low-pressure systems. One WC is the required pressure to move a 1in x 1in a column of water 1in. The reason some equipment may use WC as a unit of measurement over PSI is 1 WC is equivalent to 1/28 PSI or 0.036 PSI, and therefore it is easier to measure minute differences with WC over PSI.
What is PSI? (Pounds per Square Inch)
PSI is a unit of measurement that measures pressure, is more commonly used than WC, and applies to higher-pressure systems. One PSI is one pound of force applied to an area of one inch. PSI is the most common unit of measurement for pressure in the US and most appliances or equipment will use PSI over WC.
PSI to WC Formula
The Formula for calculating the conversion of PSI to WC is:
1 psi x 27.708= 1 WC
And for converting WC to PSI:
1 WC / 27.708 = 1 PSI
Hopefully this article has helped you with converting PSI to WC. If you notice any issues or have any comments, please feel free to reach out and let me know.
If you’re interested in converting your natural gas (also referred to as NG) appliances to propane (also referred to as LP, LPG, or Liquid Propane), or your propane appliance to natural gas, such as a bbq grill or gas range, chances are you can. Luckily, a lot of appliances are able to be converted between the two fuel types, and some will even come with the parts to do so.
Converting your appliance between the two fuels can be as simple as installing a conversion kit, whether that came with your appliance when you purchased it, or a third-party conversion kit you purchase. Sometimes, however, you may need to manually modify parts to convert the fuel system, which can be a bit tricky if you’re not familiar with gas systems. The main things you’ll be changing or adjusting are the regulator, the orifices, and the air shutters. I’ll explain more about each of these parts below.
In this guide, I will explain the general steps of what you need to do to convert your appliance from natural gas to propane or vice versa. You should always follow the exact instructions for your appliance or review the owner’s manual that came with your appliance.
Because every appliance is different, it’s impossible to give one solution to fix them all. My goal with this post is to inform you about how the general process works and to make sure you are comfortable with the steps if you decide to make the modification. For the most part, I will be referencing bbq grills as that is the most common appliance being converted, however, this also applies to other appliances that use natural gas or propane.
Note: throughout this article, I refer to converting natural gas appliances to use propane. The steps are the same for converting a propane appliance to natural gas. I also reference a few grill models and standards that may only be true for appliances and homes in the United States.
Can My Appliance Be Converted? (Grills, Ovens, etc.)
Most appliances that use natural gas or propane can be converted to use one or the other. Most appliances should come with the required parts to make the switch, however, you can purchase conversion kits if yours did not. It’s important to first make sure your appliance can use both fuels.
You will first want to look for instructions on the appliance, sometimes the instructions are on the inside of a door, or on the back near where the gas line is connected. Sometimes the parts will also be secured to the appliance in an inconspicuous location, such as behind the broiler drawer in some ovens, typically in a bag that contains instructions as well. Below are pictures of my oven which can be converted between both propane and natural gas.
This label found in my broiler drawer shows that the appliance can use either Propane or Natural Gas.
If you cannot find the instructions on your appliance, search for the model number online or call the manufacturer to get the instructions/owner’s manual. It is crucial to follow the exact instructions for your specific appliance to avoid injury or damaging the appliance, as each appliance may require specific steps in order to function properly.
On the opposite side, this label tells me that the unit was factory set to be used for natural gas, and includes the BTU ratings for each burner (4 total). measured at 4WC NG and 10WC LP. You can also see the model number which I can search to download the owner’s manual.
Note: If you’re not comfortable working with natural gas or propane, I would recommend hiring a professional to complete the conversion, or avoiding it altogether. If something is done incorrectly it could lead to property damage, personal injury, and even death. Click here to see the general steps required to make sure you are comfortable performing these modifications.
Can Natural Gas Appliances Run on Propane?
Technically yes, natural gas appliances can sometimes operate when connected to propane but it is a bad idea. Because propane runs at a higher pressure than natural gas and produces more BTUs (almost twice as much BTU for the same amount of gas), running a natural gas appliance on propane without converting the system can create issues. Because the appliance was designed for natural gas, it will deliver too much propane and create a larger flame that is more difficult to manage, as well as burn improperly and less efficiently.
If you have a natural gas appliance but want to use propane, it is crucial you convert the appliance to run on propane.
Why Convert Natural Gas Appliances to Propane or Vice Versa
Depending on where you live, converting your appliance to propane may be more beneficial or even required for your situation. If you’re living off-grid and do not have a natural gas line connection, you’ll want to make sure when purchasing appliances that they are capable of running on propane or can be converted to use propane.
And same for propane appliances, if you’re living in a house with a natural gas line, it may be more beneficial to convert your bbq grill to use natural gas over propane so you’re no longer having to purchase propane tank refills or worry about running out of gas in the middle of cooking.
The decision to convert your appliance to either natural gas or propane really comes down to convenience and necessity, as well as long-term costs. With a natural gas connection, you can potentially save money over the course of the appliance’s life, however, you are restricted to only using the appliance where it can be connected. With propane, you have the freedom to move the appliance anywhere, however, you may have higher costs to operate over time. Some people also say they can taste a difference between food cooked on a natural gas bbq vs a propane bbq. (Those people are lying)
Steps to Converting Your Appliance
An example of what the instructions will look like. This is from the manual for my oven.
Below are the general steps needed to convert your natural gas appliance to propane. I’ll go over each of the parts that need to be replaced/adjusted in more detail in the next section, as well as details about conversion kits that are available.
Turn off all valves and disconnect the current gas source from the appliance
Adjust the regulator for the new fuel type if required (usually ovens)
Remove old orifices and install new ones
Connect the hose from the fuel source to the appliance
Test the connections for leaking. I highly recommend using this Gas Leak Detecting Spray you can get from Amazon that detects gas leaks, it’s easy to use and gives you peace of mind.
Adjust the air shutters as desired, the flame should be mostly blue with white tips and steady.
You may need to perform some additional steps, however, those are the general steps required to convert your appliance to a different fuel source.
Additional steps (optional)
Adjust the pilot light. Since the new fuel is higher pressure, you may need to adjust the pilot light. This is common for Ovens.
Install a carbon monoxide detector. It’s always a good idea to have a carbon monoxide detector in your home, and if you’re making changes to the fuel source of an indoor appliance it’s smart to have a device that can detect a leak. Be aware that CO2 detectors do not detect propane leaks.
Adjust flame controls. Some appliances will need to be fine-tuned to produce a proper flame, it might be a small screw near the orifices or near the temperature valves.
Now, while these steps are generally what you will need to do to convert your appliance from either natural gas or propane, you will need to find the instructions for your specific appliance as certain steps may be different or require specific adjustments. For example, some oven ranges will require you to turn a few screws an exact amount of rotations to adjust for the new fuel type. Always refer to your owner’s manual before modifying your appliances, and make sure you are comfortable performing the modifications.
What You’ll Need To Convert Your Natural Gas Appliance to Propane
In order to convert your natural gas appliance to propane, or vice versa, you will need to replace a few parts or make adjustments to the ones on your appliance. Typically the parts you will need to replace or adjust are the regulator, the orifices, the air shutters, and the hose. Some appliances will come with the required parts to do this. If it did not, you may be able to purchase one online, and lastly, if you cannot find one online you can attempt to manually convert it. I’ll go over the options below, as well as explain in a little more detail about each part that you’re replacing or adjusting.
Natural Gas to Propane Conversion Kits
Typically, your appliance already has the required parts attached to convert the fuel source from natural gas to propane. If your appliance did not come with the required parts, you’ll need to purchase a conversion kit for your appliance. For the most part, you’ll need to search your specific appliance and model to find the one you need. You can usually find these directly from the manufacturer, or you can find third-party ones on Amazon that are compatible. For example, if you have a Charbroil Grill with dual-fuel capabilities, you can use this conversion kit to convert your bbq to use natural gas.
Weber grills for example do not come with conversion kits and Weber does not offer conversion kits for any of their grills. All Weber grills are built to use only one specific type of fuel, and the control valves internally are specific to that fuel type. Installing a conversion kit on your Weber grill will void your warranty as well. However, if you decide you still want to convert your Weber grill, you can find third-party conversion kits available online. An example is this Natural Gas to Propane Conversion Kit for Weber natural gas grills, you’ll just need to make sure your model is listed. Be aware though that this only changes the orifices, and not the control valves.
Weber has this to say about converting their gas grills:
However, due to safety considerations, the complexity of the technology and gas train components, as well as the level of disassembly required, we don’t allow conversions or provide conversion kits. Converting a grill will actually void the warranty on the unit and might create an unsafe situation. – weber.com
So even though you can find third-party conversion kits available online, it is not usually recommended for Weber grills as it voids the warranty and can create unnecessary danger if done incorrectly. The safer, and better route for Weber grills is to replace the entire grill’s manifold. Since Webers are designed for one specific fuel type, the manifolds are designed to work specifically with either natural gas or propane. So in order to use natural gas with a Weber grill that was originally designed to use propane, purchasing a natural gas manifold for the same model is the best option. This is more expensive than purchasing a conversion kit and they can be a lot harder to find but it reduces the chances of you running into issues. For example, if you have a Weber Spirit II E-210/S-210 you can purchase this Natural Gas Manifold or this Propane Gas Manifold on Amazon that will replace everything for you.
View of the manifold on a weber grill from underneath, note each burner has a separate air shutter that can be adjusted.
While this might be the case for Weber, other manufacturers do provide conversion kits, such as Charbroiler and Blackstone. You can buy Blackstone branded conversion kits online to convert your propane griddle to natural gas, however, not all models can be converted so you’ll need to make sure yours can before you purchase one. You can find out if your Blackstone griddle is compatible here.
If you cannot find the specific conversion kit, and you’re comfortable with manually converting your appliance, you can buy generic conversion kits that come with either certain-sized orifices or orifices that are designed for you to drill the correct size hole into, depending on the BTU requirements for your appliance. You will need a micro drill bit set to be able to drill the exact size hole you need for your application, I recommend starting with two sizes smaller than the final size you need and work your way up.
Parts That You Will Need to Replace or Adjust
Below are the various parts of your gas appliance that you will need to either replace or adjust. You’ll need to follow the instructions on your specific model to correctly convert your appliance, however, I wanted to give you a general idea of what parts you’ll be messing around with. As I mentioned earlier, the typical parts you will need to replace or adjust are the regulator, the orifices, the air shutters, and the hose.
Adjusting The Regulator
The regulator regulates the pressure of gas coming into the appliance, since natural gas and propane operate at different pressures (NG is typically between 3-7WC* and LP is 11WC*), you will need to make an adjustment to your appliance’s regulator. For ovens, this is usually on the bottom and requires you to take out a screw with a reversible part inside. When facing one direction, it will correctly regulate pressure for natural gas, and when flipped around it will regulate the pressure for propane. For more information on WC, check out my article on PSI to WC to get a better understanding.
*WC stands for Water Column, or how much pressure the gas is under
The regulator on my Oven that currently shows NAT for natural gas, and when unscrewed and flipped around shows LPG for propane.
Replacing The Orifices
This is presumably the most cumbersome and technical aspect of converting an appliance to use a different type of gas. The orifice is a small metal “cap” that connects to the gas supply and has a tiny hole in the middle that allows just the right amount of fuel to combine with air inside a burn tube, where combustion occurs. If the hole of the orifice is too large or too small, it can produce a flame that is too large or small, as well as burning inefficiently. Having the incorrect orifice size installed can produce long-term problems such as a blockage caused by soot, or issues with the flame when operating. Orifices are specifically designed to a certain level of precision depending on the BTU requirements and operating pressure. You can use an orifice-sizing chart to determine what size orifice your appliance needs depending on BTU output. I will expand on this below.
One orifice inside a burner on my oven, with a larger whole for natural gas.
Adjusting the Air Shutters
The air shutters are simply covers over the burn tube that allows air into the burn tube where it will mix with gas to combust. Depending on the fuel source you are using, you will need to adjust how much air is being mixed into the burn tube to ensure an optimal ratio of air to gas. Typically, you’re just loosening a screw, adjusting the cover, and testing it out until the flame looks correct. You can tell when you need to adjust the air shutters when the flame is weak or not burning optimally. You can tell when a flame is weak because instead of a blue flame with white tips, you’ll see large orange flames coming out of the burners.
Close-up view of the air shutters on my Weber grill. You can see the screw that you need to loosen in order to adjust the air shutter.
Replacing the Gas Hose
The gas hose is simply the hose that runs from either your wall where it is connected to a natural gas line, or from a propane tank to your appliance. When you purchase a conversion kit, they will likely come with the appropriate hose. Each natural gas and propane require a different hose, as well as being properly sealed. You can find hoses that work with both, such as this NG/LPG Quick Connect 12ft Hose that features a changeable connector so that it can work with either natural gas or propane. You will still need a regulator to use that hose with LPG. Rectorseal 5 is a great option for a sealant, but make sure you are only using this for connections between the hose. It is essential that you use the proper hose as well as sealants for the gas you are trying to work with.
Orifice Sizing Chart
If you’re not sure what size orifice holes you need for your appliance, you will need to calculate what size orifice hole you need. In order to determine what size orifice hole you need to buy or drill into a blank, you can reverse search by either knowing the BTU output of your appliance or by locating the current orifices and finding out what size they are. Typically the size of the orifice will be imprinted on the side of it. You can find examples online, this one is from Sinclair Supply Ltd.
Courtesy of Sinclair Supply Ltd. – ssl.ca
For example, using the chart above, assume you have an appliance that has 4 orifices (one for each burner), and each one is stamped 70 (this is the drill size), and the appliance is running on propane, using the chart you can determine the appliance is using 21,904 BTUs/hr (4*5,476). If you were to convert this appliance to natural gas, you would just drill new holes in the orifices that will allow a similar amount of BTUs/hr. In this example above, let’s say your new system will use natural gas at a pressure of 7WC, you would need to drill new holes that measure 60. This is because at 7CW, a size 61 orifice will produce 5,461 BTU/hr for each orifice, and since there are 4 orifices, the total output will be 21,844 which is the closest without going over the original BTU/hr.
Once you know what orifice size you need, you can find a conversion kit online that contains that size orifice, or you can purchase just the orifices that size. You can also purchase orifices with pre-drilled holes that are smaller than what you need and using a micro drill bit set, you can drill your own holes to fit your specific requirements.
Conclusion
In closing, converting natural gas appliances to propane (and vice-versa) can be a practical and cost-effective solution for many households. To recap the main points covered in the article:
Understanding the Differences: Recognizing the distinct properties of natural gas and propane is essential. Propane has a higher energy content and requires specific adjustments for appliances designed for natural gas.
Safety Precautions: Emphasizing the importance of safety, from turning off the gas supply to ensuring proper ventilation, is crucial in preventing accidents.
Conversion Kit Requirements: Knowing which conversion kit to use, based on the appliance and manufacturer’s specifications, ensures a smooth conversion process.
Step-by-Step Process: Following a clear, step-by-step guide, from preparing the appliance to testing for leaks, helps in achieving a successful conversion.
Testing and Adjustments: Ensuring the appliance functions correctly post-conversion by checking for leaks and making necessary adjustments is vital for safety and performance.
Choosing to convert natural gas appliances to propane involves weighing potential benefits such as energy efficiency, cost savings, and the flexibility of using propane in off-grid locations. However, it also requires careful consideration of the potential consequences, including the need for proper equipment and adherence to safety guidelines.
Some Final Tips:
Always consult the appliance’s manual and the manufacturer’s recommendations before starting the conversion.
If unsure about any step, consider hiring a professional to ensure the conversion is done safely and correctly.
Regularly inspect and maintain converted appliances to ensure they operate efficiently and safely.
Be aware of local regulations and codes that may affect the conversion process.
By following these guidelines and considering all relevant factors, you can confidently convert your natural gas appliances to propane, ensuring they operate safely and efficiently in your home.
I hope this article on converting your appliance to use natural gas or propane has been useful, and please feel free to reach out with any questions, concerns, or comments.
Propane tanks consist of three major parts: the tank, the valve, and the regulator. The regulator is one of the most important parts of a propane system. It helps control the flow of propane into your appliances, regardless of what the pressure inside the tank is. This is important as the pressure inside the tank can change drastically depending on altitude, temperature, and fill level. Your appliance, whether it’s a bbq or heater system, will require consistent pressure to operate, which is why it is crucial your propane regulator is working correctly.
The most common cause for a frozen regulator is liquid propane has some how gotten inside the regulator and has frozen due to pressure and temperature changes. To thaw a frozen propane regulator, pour hot water over the regulator or attach some hand warmers to it. Wait a few minutes and it should start working again. This should work for most cases, but I’ll go over some other options below, as well as how liquid propane might get inside a regulator, and why frost on your regulator can be normal and not a sign of it being frozen.
Why Do Regulators Freeze?
Because regulators have propane passing through them and going from a high pressure to a low pressure, the temperature will drop causing the regulator itself to become very cold. This can cause condensation to form inside and outside the regulator, and depending on temperature can cause frost to form on the outside. It is normal for frost to accumulate on the outside of a regulator during operation and will not cause any issues. So if you see frost on the outside of your regulator, but you are still getting a steady flow of propane, you do not need to do anything.
However, if liquid propane or any other liquid enters the regulator this is when you can experience freezing issues. The most common reasons liquid propane might enter a regulator is because the tank was overfilled, or the tank was horizontal allowing liquid propane to enter the regulator. Propane tanks should never be stored on their side or used horizontally (unless specifically made to be used horizontally).
Not only can liquid propane enter the regulator, but water vapor can also condense in extreme temperatures and freeze inside the regulator. If you filled your tank during the summer, it most likely did not contain Methanol (a chemical added for anti-freezing). When propane exits the outlet side of a regulator it changes from a high-pressure vapor to a low-pressure vapor which causes the temperature to drop dramatically. In a setting where the liquid propane is at 32F and expands to a vapor of 1.5psig, the temperature of the exiting evaporation from the regulator will be around -112F. This can cause any water in the propane to freeze when vaporized in the regulator. Because of this extreme temperature drop, methanol can be added to stop water from freezing when mixed with the propane vapor.
From a report given to the Propane Education & Research Council, if a propane tank contained even just 80ppm of water, when fueling a 100,000 BTU/hr system, 1gram of water per hour is being carried with the fuel through the regulator. Even if a portion of that liquid condenses and freezes at the regulator, a blockage can occur. This can even occur in warm ambient temperatures. However, this only occurs when there is enough water mixed with the propane. Even when the water content is around 20ppm, no water will come out of the solution. Methanol is only recommended when temperatures are expected to be below 35F.
What To Do If Your Regulator Freezes
I’m going to assume you’re in a position where your regulator is frozen, and you’re not sure if you have methanol in it. Adding methanol at this point isn’t going to do much, so you’ll need a simple solution to thaw your regulator and get it working again. Once you have it working again, I would recommend having methanol added if you’re in freezing temperatures.
Firstly, you’ll want to warm up the regulator with whatever you have available to you. Because the regulator has frozen liquid inside it, you need to simply warm this up however you can. You can use hot water, hand warmers, an electric blanket, or some form of heating tape. If you have pipe heating tape on you, then congratulations on being the most prepared person ever, but chances are you don’t.
A few ways to fix a frozen propane regulator are:
Using Hot Water
The easiest and quickest solution, as well as the most readily available, is just using hot water over the regulator. Heat up some water and slowly pour it over the regulator. You may need to do this a few times, but it should eventually warm up enough to free up blockage. Make sure to start using the propane right away to ensure there is a constant flow of propane through the regulator.
Attaching Hand Warmers
You may have some chemical-reaction heating pads or hand warmers with you, these can be activated and attached to the regulator to slowly warm up the regulator. After you’ve got it attached you can wait a few minutes and try using your appliance again, if it doesn’t start right away just wait longer and try it again. I would say it should work after 10 minutes but could take up to an hour depending on how cold it is and what size warmer you’re using. Because these are so versatile, I would recommend just buying a few and having them where you store your propane tanks in case this ever happens. They’re small enough to easily store and have a good storage life.
Wrapping An Electric Blanket or Other Electric Heating Pad
Depending on if you have electricity available, electric blankets or any other electrical heating device can work too. Simply plug in the blanket, wrap it around the regulator, and wait. If you’ve got a portable battery, you can even use a battery-powered heater option to warm up the regulator.
Hopefully you’ve got propane flowing now and you’re nice and toasty or your grill is working again. If you tried these methods and you’re still not getting propane, you may need to try resetting your propane system by purging the regulator.
Purging A Regulator (Resetting it)
Purging a regulator just means you’re removing the propane inside the regulator that might be causing the ball bearing in the bypass or flap to be stuck. If you believe your regulator is not allowing gas through and it’s not caused by frozen liquid inside, purging the regulator is a fast and easy way try and fix the issue. This can also help with any safeguards your appliance may also have on them. This can trigger due to a number of reasons, but usually, it’s due to a change in the pressure of the regulator, such as too low a pressure that causes the bypass to close thus restricting the flow of gas.
To purge or reset a regulator follow these steps:
Fully close the valve on your propane tank
Disconnect the propane hose/regulator from the propane tank
Turn on all burners or valves on your appliance to clear the lines of propane
Wait a minute and then turn off all the burners or valves on your appliance
Reconnect the propane hose/regulator to your propane tank
Slowly open the valve on the propane tank all the way (propane tank valves should always be fully opened when being used)
Turn on your appliance or burners.
Make sure to always ignite your appliances that are connected to propane in the same order to ensure proper operation. The order you ignite your systems should always be:
Make sure the appliance is off
Open the propane tank valve all the way slowly
Turn on the appliance
If you start the process by having your appliance or burners in the on position before opening your propane tank valve, there is a good chance you will trigger a safeguard and your appliance will not work correctly. When turning off your appliance, follow these steps in reverse order.
Planning Ahead For Next Time
With a little planning ahead you can save yourself a lot of time and headaches. If you’re planning on using your propane tanks in freezing temperatures, make sure to bring along a few of the above mentioned items, whether that’s a few chemical-reaction hand warmers or electric blankets if you’ll have electricity available. If your local propane dealer is able to add methanol to your tanks, I would highly recommend that. However, it isn’t that common for propane exchange stations to be able to do this, especially those little ones you find at gas stations. Depending on your location, you may want to contact your local propane company and ask them about where to find a location that can either sell you a tank with methanol added or where you can go to have it injected.
You can also purchase heating blankets for your entire propane tank to reduce snow build-up and keep pressure high. Making sure your propane tanks are full will also increase the pressure inside. When propane tanks are full, they have a much higher pressure when temperatures drop and are less likely to run into issues.
To reduce the chances of liquid propane or other liquids entering the regulator you should always make sure the regulator is higher than the valve. This way if any condensation forms in the pipes they will drip back down towards the valve and not inside the regulator. Also, be sure to protect your regulator from harsh weather conditions, you should never let snow build up around your propane tank or regulator.
If you’re at a home where it normally gets below freezing and you’re utilizing a company to fill your largers tanks, such as 120 gallon or 500 gallons, there is a good chance they already add methanol in the months leading up to winter. Make sure to ask about adding methanol if you plan on filling in the summer months but won’t likely refill before winter.
I hope you found this information helpful and please don’t hesitate to reach out and correct anything I mention or ask me questions.
Torches such as Bernzomatic are great tools that serve a multitude of purposes, but sometimes they can stop working out of the blue. So if your propane torch won’t light or has a weak flame, I’m going to help you fix it before you go out and buy a new one. And if it’s not working after trying these fixes I have a few recommendations for replacements that will suit your needs whether you’re welding in a crawl space or putting a nice sear on your steak. But to get straight to the point though – if your propane torch won’t stay lit or light at all, first check that the ignition wire is making a spark, and secondly clean the inside of the burn tube. From my personal experience, almost all propane torch issues are going to be fixed by just checking the ignition wire and cleaning the burn tube, they’re pretty straight-forward tools without many parts to worry about.
Propane Torch Issues – (Not Lighting or Low Flame, etc.)
Most common torches that you can buy are pretty straightforward devices, and most issues can be fixed by using a simple step-by-step process. This guide is mostly targeted at propane or map-pro torches like a Bernzomatic Torch, however, these steps will also help with other torches. Some of the common issues that can occur with propane torches are:
Propane Torch Won’t Light or Stay Lit
The most common issue you might face with your propane torch is that it won’t even ignite. If your propane torch isn’t igniting at all you should follow the step-by-step guide below on fixing a propane torch. This is usually caused by an issue with the ignition wire on trigger-assisted models or a form of blockage in the main burn tube (see photos below). Luckily, disassembling the main components of your device is easy and can be cleaned without any special tools.
Before trying to adjust anything, make sure your propane tank isn’t empty. A typical 14oz propane tank bottle or cylinder contains roughly 0.9 lbs of propane, and with a standard 13,000 BTU tip will only last 1.5 hours of continuous use. For other propane tank sizes and how to figure out if your tank is empty check out my article on how long propane tanks last and how to check if it’s empty. I included some standard sizes as well as a calculator you can use to see how long your tank will last.
If your torch is lighting but won’t stay lit, try cleaning out the burn tube thoroughly. In most cases when a torch won’t stay lit it’s because some form of debris got lodged in the tube and is restricting gas flow. Another issue may be the airflow regulator if your model has that, however, these are not as common. Try reducing or increasing the amount of air until your flame is consistent. And lastly, make sure you are not tilting your torch unless it has a pressure regulator. If your model does not have a pressure regulator, tilting the fuel bottle can allow liquid fuel to enter the burn tube and extinguish the flame. Only units that have a pressure regulator will work while inverted.
Note: You should not try to clean or maintain the pressure regulator on your device and o-rings should not be replaced. If your torch is having issues with gas leakage you should replace the entire unit. It’s better to spend the money on a brand-new unit than have a possible explosion or fire start due to a faulty torch. See what propane torches I recommend below for a replacement depending on what you’ll be using a torch for.
Weak Flame
If your propane torch lights, but the flame is weak, first make sure that your fuel tank is not low. Replace the tank with another full fuel tank and see if the issue persists. If the flame is still weak on a full fuel tank, try cleaning the burn tube. Some units will also contain a small mesh screen that can get clogged up and you should be able to clean it with some compressed air.
When working properly, propane torches can reach temperatures upwards of 3,600F and can be used for a variety of applications such as soldering, brazing, and light welding jobs. When equipped with an oxygen-fed system utilizing a separate oxygen tank, temperatures can reach as high as 5,100°F. For more information on propane torch temperatures, or to compare other fuel types such as Map-Pro or Acetylene, check out my article: Propane Torch Temperatures vs Others ((MAPP, MAP-Pro, Butane, Acetylene)
If your propane is producing a weak flame, you will have issues performing these task and may think your torch is not capable of handling these tasks, however, it may just be as simple as cleaning the burn tube.
Difficulty Starting
If you’re having a difficult time starting the flame on your torch, try turning down the flow of gas when you are igniting the torch. Most torches will light easier with a low flow of gas. You can turn the gas up once it’s lit.
Depending on the model of the torch you have, you may or may not be able to use it inverted. If the unit you have contains a pressure regulator, you should be able to use it while inverted. Most manual ignition torches will not have a pressure regulator. If your model does contain a pressure regulator but does not work upside down, and you have followed my step-by-step process to fixing a torch, you should get a replacement unit as your pressure regulator o-ring may be damaged and leaking. These leaks are not as easy to identify as they might only occur when the bottle is inverted.
Steps to Fix your Propane Torch
I’ve put together this step-by-step guide on how to easily fix 99% of torch issues, if you follow these simple steps it should start working again. If not, it may be time for a new torch.
To the right, I’ve included a diagram of the parts of a common torch, the Bernzomatic TS4000. Depending on what model you have and whether it’s manual or trigger igniting, your torch may look different. However, the two important parts to notice are the burntip and burn tube. Below I include some pictures of my TS8000 as reference.
Before working on your torch, make sure to remove the fuel tank.
1. Check The Ignition Wire
First, you should check that the igniter is working properly by removing the burntip (the top portion of the tube that is removable). To do this you may need to use pliers to twist it off. I recommend using a cloth wrapped around the burntip so you don’t cause any additional damage. Once the tip is removed you’ll see a small wire near the top of the burn tube, this is the ignition wire. Click on your ignition button and see if you can see an arc between the ignition wire and the outer wall. If you do not see a spark when clicking the igniter you can fix this by moving the wire closer to the outside wall of the burn tube. The wire should be around 1/8″ from the burn tube wall. If you still do not get a spark you can use a piece of sandpaper to clean the tip of the ignition wire as well as the top of the burn tube. Hopefully, you should now see a spark, and you can reconnect the fuel tank to your torch and test it out.
You can see the ignition wire inside the tube after I have removed the burntip.A working ignition wire creating a spark between the wire and burn tube wall. If you do not see this when clicking the starter, try moving the wire closer or farther away.
2. Clean The Burn Tube
If you are getting a spark and the torch still isn’t lighting after reconnecting to your fuel tank, remove the fuel tank again and clean the burn tube. Sometimes cobwebs or dust can enter the tube and create a blockage that will stop the flow of gas. Using a soft pipe cleaner is the best as you it will easily clear out any debris without damaging the ignition wire. You can also use compressed air to try and dislodge any dust or remaining particles after cleaning.
You can insert compressed air or a wirebrush through the top or bottom hole seen here, just make sure to check the ignition wire still creates a spark afterwards.The burntip (the removable tip) on the TS8000 has fins inside of it, you may experience a blockage here you can try clearing with compressed air or a wire brush.
And that’s it! There isn’t much to propane torches, and these two simple steps should get your torch working again. And if nothing has worked, its time to…
Replace Your Faulty Unit
Lastly, if you followed these steps and your torch still isn’t igniting or isn’t operating normally, it’s probably time to replace the unit. While torches don’t require a lot of maintenance and are hard to break, they won’t last forever. Before purchasing a new torch I’d recommend looking up your product’s warranty and seeing if it is still covered, some manufacturers such as Bernzomatic offer limited lifetime warranties on certain products.
And if your propane tank is actually the cause of issues, I’d recommend purchasing a new one. Make sure to dispose of your current canister properly, as you propane bottles are considered hazardous waste and cannot be thrown away in your normal garbage and will need to be taken to a hazardous waste recycling center.
Recommended Torches
I personally recommend the Bernzomatic TS8000 for its versatility and functionality, since it has an adjustable flame and can use propane, and MAP-Pro gas. The link above takes you to Amazon where it’s now the same price as its predecessor, the TS4000 which I used to recommend as well. And for something simpler, the TS3500 version is great for those who want a more inexpensive torch that is very versatile and great for home crafts.
The TS800 is able to use both propane and MAP-pro fuel and has an adjustable flame, whereas the TS4000 only uses propane and has a fixed flame. The TS3500 version features an adjustable flame similar to the TS8000 and has an ergonomic handle that is great for using on projects for extended periods of time.
Both of my recommendations are Bernzomatic because the company produces high-quality products with high-quality materials and is made right here in the USA.
Bernzomatic TS8000
This high-performance torch has an instant on/off ignition that is great for ease of use, and is what I used for all my pictures above as I use this model at home. I like it because it features a lock button that you can use to keep the flame on without holding the trigger, and when the lock is off the torch is instant on or off. It can also use all both propane or MAP-Pro, which can be great when you want to use a fuel with a higher heat transfer for faster jobs. The flame tip on this model can also be adjusted by increasing or reducing the flow of gas through the tip, allowing you to produce a large more distributed flame, or a higher precision pencil tip flame.
This model also contains a pressure regulator so you can use it inverted, which can almost be a necessity when working in a crawl space. Overall, this torch just has everything you need and is extremely easy to use.
Bernzomatic TS3500
If you’re just looking for a do-it-all torch for around the home this is it. It’s a step up from a manual ignition torch and it has a very ergonomic handle which makes it great to use, even for someone who doesn’t normally handle torches. It also has an adjustable flame which is great for DIY projects and simple household repairs. This model also contains a pressure regulator, so just like the TS8000T it can be used while inverted. And if you’re just looking for a simple torch head and want to save money, the WT2301 is about half the price of the TS8000, and only a few dollars more than the cheapest torch head, but comes with a trigger on/off switch which is really nice.
Conclusion
In closing, troubleshooting a propane torch can be straightforward when you understand the common issues and their solutions. Recapping the main points:
Ignition Problems: Often due to a dirty nozzle or insufficient gas flow. Ensure the nozzle is clean and the tank is adequately filled.
Weak Flame: Typically caused by a low gas supply or a clogged burntube.
Torch Not Staying Lit: This issue can arise from obstructions in the nozzle or low gas pressure. Clean the nozzle thoroughly and verify the gas pressure.
Some Final Tips:
Regularly inspect and maintain your propane torch to prevent common issues.
Always ensure proper ventilation when using a propane torch.
Familiarize yourself with your propane torch model and read the manual to understand what it’s capable of and common issues.
Hopefully you found this guide helpful and my step-by-step process has your torch working again! If you have any questions or recommendations please feel free to reach out. I strive to give the most accurate information I have, so if you see an error please let me know and I’ll be quick to address it.
Installing solar panels on your home is a great way to cut down on your electric bill. You usually find solar panels on large houses or commercial buildings, but you can also put solar panels on RV’s, and other manufactured homes (sometimes known as mobile homes). Unfortunately, installing solar on your manufactured home is not always as straightforward as installing solar on a non-mobile home. You’ll need to check a few items before you go and purchase solar panels, as there is a chance you will not be able to install them.
Can I Install Solar Panels On My Manufactured Home?
Like most home improvement upgrades, being able to install solar panels on your manufactured home will greatly depend on your local building ordinances. Some cities will allow solar upgrades to manufactured homes but most local codes will require solar panels to be installed on dwellings with a solid foundation.
Luckily, even if you’re unable to install solar panels directly on the roof of your home you can still utilize solar energy. Solar Panels can also be installed on other structures on the property, or on specialized ground mounts.
To find out if you can install solar panels on our manufactured home you’ll need to contact your county and city zoning board to see if there are any regulations on installing solar panels. Next, you’ll want to contact your property management to confirm any residential structure can have solar installed on it.
Let’s look at the two options for installing solar panels on your manufactured home:
I Can Install Solar Panels On My Roof
If you are allowed to install solar panels on your home’s roof you’ll want to start by reaching out to a local solar panel installation company if you do not plan on installing them yourself. Due to the complexity of solar and electrical knowledge required its greatly recommended to work with a local company.
To aid your local solar installation company you’ll want to locate the model of your home type and any other identifying info to help them with the installation process. The installation company will need to know where all joist, electrical, and structural support beams are located to properly install your solar panels.
If you’re planning on installing solar yourself, you’ll still want to research the model of your home and figure out where supports and wires are located.
I Cannot Install Solar Panels On My Roof
If you are not allowed to install solar panels on your home’s roof, but you are allowed to have them on your property, you’ll need to find alternative locations you can install them. First see if you have any other structures on your property that will allow you to install solar panels on the roof, such as a shed, car-port, or other structure with a foundation. While solar panels do not need direct sunlight to work (see my article on solar panels in indirect sunlight to learn more), they can lose a large portion of their efficiency if they are obscured. Make sure to position them somewhere they will get the most direct sunlight throughout the day to produce the most energy.
If you do not have another structure that you can install solar panels on top of you’ll need to find a location you can install them on the ground with a solar ground mount. Similar to installing on your roof, the easiest option is to reach out to your local solar installation company and see if they offer ground-mounted solutions, and they can come and give you your best options.
However, if you’re installing these yourself, you will want to figure out which part of your property receives the most consistent and intense amount of direct sunlight. You will also want to make sure the area you plan on installing solar panels is clear of objects that could block direct sunlight such as your house, overhangs, trees, and other tall objects. For optimal solar power generation, your solar panels should be in direct sunlight for around 6 hours every day.
The cost of solar panels is greatly determined by the wattage requirements of your home and related installation fees such as labor, mounting, and batteries. You’ll first need to calculate how many watts you need to produce to figure out how many panels you need. I recently wrote an article on figuring out what size generator you need for off-grid homes, and it goes into great detail about calculating wattage. Determining what size generator you need is very similar to determining what size solar panels you need, as it all comes down to how many watts you use.
The average 6Kw solar panel system in America cost around ~$15,300. A 6Kw system is ideal because the average home in America uses ~30kw of power per day, or around ~1.87Kw/hour in a 16-hour day (7am-11pm). However depending on what appliances you use, such as an electric oven or heater, you may use over 5Kw/hour so you will want a higher-powered system.
When you calculate your wattage requirements, you’ll want to add up how many watts all the appliances you run at the same time use, including starting watts. This can be figured out using a wattage worksheet, but the basic breakdown is:
add up all the wattages of appliances that you plan on using
Figure out which appliance has the largest starting watts
Combine the total watts of the appliances, plus the largest starting watts
This final number will be the total watts you’ll want to be able to produce for solar
This is however assuming you want to power 100% of your power requirements through solar. You do not need to power your entire home with solar. You can opt to only supply 50% or whichever amount you like, as any amount will still help reduce your electricity bill. If you are planning on using solar to charge batteries, however, being able to supply the total wattage requirements for your home is the best option.
Not all solar installations require batteries, however. There are two types of solar installation: off-grid and grid-tied. Most people think of solar panels as being off-grid, where you have solar panels that charge batteries and those batteries supply power to your home. However with grid-tied solar, you do not need batteries, all solar power is fed directly to your utility connection and saved “on the grid”. Your normal utility provider then credits you for the amount of electricity being supplied.
Using a grid-tied system is great since you do not need to worry about batteries or the cost that comes with them. The downside to utilizing this method is in the event of a power outage because you are not directly storing electricity, you will also be without power.
There are other things that affect the cost of solar panels for your home, such as local
How Many Solar Panels Needed for Manufactured Homes
The number of solar panels you need for your manufactured home can be figured out by the space you have available and the watts you need to produce. If you have more space, you may opt for lower output panels, but more of them. By calculating the watts your house uses you can get an idea of what size you need. For example, if your home uses 4kw of power, you would need 10 400w solar panels or 26 150w solar panels. You can probably guess it, but you are most likely not going to be able to fit 26 solar panels on the roof of your manufactured home. For manufactured homes, it is better to get higher-powered panels since you have limited roof space or limited yard space for solar.
I recently wrote an article about the importance of having a backup generator for your home in case your power goes out and you need an alternative source of energy. Sometimes Solar won’t do the trick either, and that’s where your backup generator comes into play. Some people can get by with a small portable gas or propane generator, however, for those with large homes that use more power and want to rely on natural gas/propane, Generac Generators are a great option.
Generac Generators
Whether you’re off-grid or in the middle of suburbia, a backup generator will give you peace of mind. And if you’re debating on whether to choose a Generac generator, I recently wrote an article on the pros and cons of propane generators. The great option with Generac generators is they commonly run on both natural gas and propane, so you have the added benefit of using natural gas which most hybrid generators do not offer. Make sure to also check out my posts on the pros and cons of both gasoline generators, and diesel generators.
Now when choosing a Generac generator, you’ll also need to account for how many Watts you need output as well as the size of fuel source you have available, especially if you’re connecting to an off-grid propane tank. I’ve gone ahead and created this table listing all Generac Generators and their models while showing the amount of fuel consumed whether using natural gas or propane.
Generac generators come in many sizes, and depending on your needs you may opt for a smaller or larger size. The smaller sizes are typically the Generac 7.5kw generators to Generac 14kw generator models. For most homes however, you’ll be choosing on of the more common sizes, such as the Generac 18kw generators, Generac 22kw generators, Generac 24kw generators, and Generac 26kw generator models. And for the most demanding situations, you’ll be looking at the larger sizes which range all the way from the Generac 30kw generators to Generac 150kw generators.
In my Generac fuel consumption chart below, I decided not to include Generac Generators that run on Diesel as they seem more targeted towards commercial use, and I don’t know many homes that have Diesel tanks large enough to keep these running.
Related: Converting your appliances from natural gas to propane or vice versa? Check out my article on how to convert natural gas & propane appliances to see examples of the steps involved. Note that each appliance will require different steps and Generac generators will have their own specific directions to follow.
How Much Propane Does A Generac Use?
The Generac fuel consumption chart below will help you figure out what size generator can be the most efficient for you. Depending on what size home you have, and what size propane tank you have, you might want a smaller or larger generator. Fuel consumption for Generac generators can range from 0.87 gallons of propane per hour to 3.63 for common household sized generators. The most common Generac generator size houses will use is one of the Generac 26kw models.
The Guardian 26kW Home Backup Generator running at 50% load will consume 2.06 gallons of propane per hour. A house with a 500 gallon tank can run for around 8 days uninterrupted at 50% load, or 5 days at 100% load.
To help you calculate all options, you can choose your Generac model below, as well as the load you plan to run at and the size of your propane tank to calculate how long you could theoretically power your home strictly off propane.
If you’re not sure what size generator you need, I recommend checking out my article all about off-grid generators, where I answer how to determine what size generator you need. Even if you don’t plan on using this for off-grid living, the information on what size generator you need will be the same.
Generac Generator Propane Consumption Calculator
Use this calculator to figure out how long your generac propane generator can run for. This information is based on data pulled from model spec sheets, but your specific situation may vary resulting in different results. This information may not be exact, and you should contact Generac if you need exact numbers for your situation.
Due to limited Data, this calculator only shows models with ouputs from 7.5kW-26kW and excludes the Protector Series.
Note: Visit my article on how many gallons of propane are in a tank to figure out how many gallons of usable propane are in your size tank. Propane is usually only filled to ~80% of their tank size. For example a 500 gallon tank only has 400 gallons of usable propane.
Generac Generator Fuel Consumption Chart By Model
I have pulled all of this information directly from the Generac websites, under each product’s Spec Sheet that they provide. I only made this because they did not have an easily accessible table showcasing all their models together, and may be missing products that have recently been added. Please reach out to me if you find any incorrect or missing information.
Generator Name
Generator Model
Fuel Type
Unit
1/2 Load
Full Load
Guardian 26kW Home Backup Generator WiFi-Enabled Spec Sheet
G007290-0, G007291-0
Natural Gas
ft³/hr (m³/hr)
188 (5.32)
333 (9.43)
Propane
ft3/hr (gal/hr) [L/hr]
75 (2.06) [7.78]
132 (3.63) [13.73]
Guardian 26kW Home Backup Generator with Whole House Switch WiFi-Enabled Spec Sheet
G007290-0, G007291-0
Natural Gas
ft³/hr (m³/hr)
188 (5.32)
333 (9.43)
Propane
ft3/hr (gal/hr) [L/hr]
75 (2.06) [7.78]
132 (3.63) [13.73]
PowerPact 7.5kW Home Backup Generator with 8-circuit Transfer Switch Spec Sheet
G006998-1
Natural Gas
ft³/hr (m³/hr)
73 (2.07)
117 (3.31)
Propane
ft3/hr (gal/hr) [L/hr]
31.6 (0.87) [3.29]
51.6 (1.42) [5.37]
Guardian 10kW Home Backup Generator with 16-circuit Transfer Switch WiFi-Enabled Spec Sheet
G007171-0, G007172-0 (10 kW)
Natural Gas
ft³/hr (m³/hr)
101 (2.86)
127 (3.60)
Propane
ft3/hr (gal/hr) [L/hr]
36 (0.97) [3.66]
54 (1.48) [5.62]
G007173-0, G007174-0, G007175-0 (13 kW)
Natural Gas
ft³/hr (m³/hr)
154 (4.36)
225 (6.37)
Propane
ft3/hr (gal/hr) [L/hr]
56 (1.54) [5.83]
90 (2.45) [9.28]
G007176-0, G007177-0, G007178-0 (16 kW)
Natural Gas
ft³/hr (m³/hr)
182 (5.15)
245 (6.94)
Propane
ft3/hr (gal/hr) [L/hr]
62 (1.70) [6.45]
109 (2.99) [11.32]
Guardian 10kW Home Backup Generator WiFi Enabled Spec Sheet
G007171-0, G007172-0 (10 kW)
Natural Gas
ft³/hr (m³/hr)
101 (2.86)
127 (3.60)
Propane
ft3/hr (gal/hr) [L/hr]
36 (0.97) [3.66]
54 (1.48) [5.62]
G007173-0, G007174-0, G007175-0 (13 kW)
Natural Gas
ft³/hr (m³/hr)
154 (4.36)
225 (6.37)
Propane
ft3/hr (gal/hr) [L/hr]
56 (1.54) [5.83]
90 (2.45) [9.28]
G007176-0, G007177-0, G007178-0 (16 kW)
Natural Gas
ft³/hr (m³/hr)
182 (5.15)
245 (6.94)
Propane
ft3/hr (gal/hr) [L/hr]
62 (1.70) [6.45]
109 (2.99) [11.32]
Guardian 14kW Home Backup Generator with Whole House Switch WiFi-Enabled Spec Sheet
G007171-0, G007172-0 (10 kW)
Natural Gas
ft³/hr (m³/hr)
101 (2.86)
127 (3.60)
Propane
ft3/hr (gal/hr) [L/hr]
36 (0.97) [3.66]
54 (1.48) [5.62]
G007223-0, G007224-0, G007225-0 (14 kW)
Natural Gas
ft³/hr (m³/hr)
195 (5.52)
256 (7.25)
Propane
ft3/hr (gal/hr) [L/hr]
65 (1.81) [6.87]
112 (3.07) [11.61]
G007226-0, G007228-0 (18 kW)
Natural Gas
ft³/hr (m³/hr)
169 (4.79)
247 (6.99)
Propane
ft3/hr (gal/hr) [L/hr]
62 (1.70) [6.45]
110 (3.02) [11.44]
Guardian 14kW Home Backup Generator with 16-circuit Transfer Switch WiFi-Enabled Spec Sheet
G007171-0, G007172-0 (10 kW)
Natural Gas
ft³/hr (m³/hr)
101 (2.86)
127 (3.60)
Propane
ft3/hr (gal/hr) [L/hr]
36 (0.97) [3.66]
54 (1.48) [5.62]
G007223-0, G007224-0, G007225-0 (14 kW)
Natural Gas
ft³/hr (m³/hr)
195 (5.52)
256 (7.25)
Propane
ft3/hr (gal/hr) [L/hr]
65 (1.81) [6.87]
112 (3.07) [11.61]
G007226-0, G007228-0 (18 kW)
Natural Gas
ft³/hr (m³/hr)
169 (4.79)
247 (6.99)
Propane
ft3/hr (gal/hr) [L/hr]
62 (1.70) [6.45]
110 (3.02) [11.44]
Guardian 14kW Home Backup Generator WiFi-Enabled Spec Sheet
G007171-0, G007172-0 (10 kW)
Natural Gas
ft³/hr (m³/hr)
101 (2.86)
127 (3.60)
Propane
ft3/hr (gal/hr) [L/hr]
36 (0.97) [3.66]
54 (1.48) [5.62]
G007223-0, G007224-0, G007225-0 (14 kW)
Natural Gas
ft³/hr (m³/hr)
195 (5.52)
256 (7.25)
Propane
ft3/hr (gal/hr) [L/hr]
65 (1.81) [6.87]
112 (3.07) [11.61]
G007226-0, G007228-0 (18 kW)
Natural Gas
ft³/hr (m³/hr)
169 (4.79)
247 (6.99)
Propane
ft3/hr (gal/hr) [L/hr]
62 (1.70) [6.45]
110 (3.02) [11.44]
EcoGen 15kW Home Backup Generator WiFi Enabled Spec Sheet
G007163-0
Natural Gas
ft³/hr (m³/hr)
195 (5.52)
278 (7.87)
Propane
ft3/hr (gal/hr) [L/hr]
67 (1.84) [6.95]
100 (2.76) [10.45]
Guardian 18kW Home Backup Generator with Whole House Switch WiFi-Enabled Spec Sheet
G007171-0, G007172-0 (10 kW)
Natural Gas
ft³/hr (m³/hr)
101 (2.86)
127 (3.60)
Propane
ft3/hr (gal/hr) [L/hr]
36 (0.97) [3.66]
54 (1.48) [5.62]
G007223-0, G007224-0, G007225-0 (14 kW)
Natural Gas
ft³/hr (m³/hr)
195 (5.52)
256 (7.25)
Propane
ft3/hr (gal/hr) [L/hr]
65 (1.81) [6.87]
112 (3.07) [11.61]
G007226-0, G007228-0 (18 kW)
Natural Gas
ft³/hr (m³/hr)
169 (4.79)
247 (6.99)
Propane
ft3/hr (gal/hr) [L/hr]
62 (1.70) [6.45]
110 (3.02) [11.44]
Guardian 18kW Home Backup Generator WiFi-Enabled Spec Sheet
Solar-powered lights are a great lighting solution for your home, garden, or remote locations. They do not require a wired connection to a power source and have a long lifetime. Solar-powered lights do not require direct sunlight, and can work when located in partial shade, or even without direct sunlight. Solar-powered lights are a cost-effective and environmentally friendly alternative to traditional electric lights that come in many different types.
It’s important to know if solar-powered lights will work for your situation as they may not always be the best option. I’ve seen a lot of people ask about using solar-powered lights, or have doubts if they can use them since they would want to place them in a location that does not get direct sunlight. I’ve talked about using solar-powered lights over low-voltage lights with friends before, but figured if it’s a question I’ve answered more than once before, it’s worth writing about!
Solar-Powered Lights Work in Multiple Lighting Conditions
Whether you’re in rainy Oregon or sunny California, solar-powered lights can provide easy lighting in a multitude of scenarios. Solar-powered lights work well in multiple lighting conditions because they use photovoltaic cells, also known as solar cells, to convert the sun’s energy into electricity. These cells are able to function in a variety of lighting conditions including low light and even overcast or cloudy days. This is because they are able to capture more than just visible light including infrared and ultraviolet. This allows them to generate electricity even when the sun isn’t directly shining on them. This is similar to how you can get sunburnt even in overcast conditions.
In addition, most solar-powered lights have built-in sensors that adjust how bright they are to match the current lighting conditions. By producing more light in dark conditions and less light during brighter conditions, they are able to preserve more energy allowing them to work when they are not able to receive direct sunlight.
Do Solar Powered Lights Need Direct Sunlight?
While direct sunlight is best for solar-powered lights, they do not require direct sunlight to generate electricity and can function even when they are in indirect sunlight or shade. This is because their solar panels are able to convert the energy from the sun into electricity, regardless of whether there is direct or indirect sunlight. Indirect sunlight is light that has been scattered by clouds or other objects before reaching a solar panel. This scattered light can still be converted into electricity by a solar panel, it’ll just take longer to charge the battery. Some forms of artificial light, such as LED’s and lightbulbs are even capable of powering solar panels. However, the logistics of charging a solar-powered light with artificial light would essentially negate the need for a solar-powered light.
And similar to how most lights have a sensor to brighten/dim the amount of light, they also have sensors to automatically turn on automatically at night and turn off in the morning. This means that even if the lights are not in direct sunlight during the day, they will still be able to function at night as long as they have received some sunlight during the day.
Another factor that allows solar-powered lights to work even when they’re not in direct sunlight is the battery. The solar panels on the lights charge the battery during the day, and stored energy in the battery powers them at night. This means that even if they don’t receive direct sunlight for a few days, stored energy in the battery will still power them at night. (this will depend on the size of the battery and the life of the battery, and how well charged it is)
Solar Power Efficiency in Shade VS Direct
Generally, speaking, solar panels are around 25-40% less efficient when charging in the shade than they are in direct sunlight. This means that if a solar panel generates 100 watts of electricity in direct sunlight, it may only generate 60-75 watts of electricity in the shade.
Furthermore, the effect that shading has on solar panels may vary depending on how much shade is the panel is in. Light shading, such as when a solar panel is shaded by a thin cloud or light fog, may only reduce the panel’s efficiency by a small amount; however, heavy shading, such as when a solar panel is shaded by a large tree or other type of tall structure, can reduce its efficiency by much more.
The type of solar panel on the light will also affect the efficiency, for example a monocrystalline solar panel will produce more power than an amorphous solar panel in the same lighting conditions. So if you plan on having a light in a shaded location, you may want to find a light with a higher quality solar panel so that it produces more power with little light.
What types of solar-powered lights are there?
There is a good chance that for whatever scenario you need to install a light, you’ll be able to find a solar-powered version that will work for you. Solar-powered lights come in a number of various uses, some are more decorative while others are more robust and weatherproof. A few of the most common types of solar-powered lights on the market are:
Landscape lights: These are designed for use in gardens, yards, and other outdoor areas. They come in a variety of styles such as spotlights, pathway lights, and deck lights, and can illuminate landscaping features such as gardens and decks. I personally love my patio string lights that we have hanging over our back patio, which we have set to automatically turn on at sunset and turn off around midnight.
Security lights: These are usually floodlights, spotlights, and cameras. Some come with more durable housing and brighter lights than a landscaping light would have. Some will include motion detectors to turn on automatically when activated, which can be great even for non-security uses such as in dark areas around your house like near your garbage cans. I personally don’t recommend getting solar-powered security lights, but if it’s the only option it’s better than nothing.
Indoor lights: These can be used as a primary or supplementary lighting source for illuminating rooms, hallways, and other indoor areas. They come in various designs and styles, such as table lamps, floor lamps and ceiling lights.
Portable lights: These are designed to be portable and come in various designs and styles such as lanterns, flashlights, camping lights etc. They are ideal for camping, hiking, emergency situations, and other outdoor activities where electricity is not available. Solar-powered lanterns are great when camping – you can leave them out all day and then at night you can bring them in your tent and they’ll last all night.
How long can they produce light?
A solar-powered light typically uses a rechargeable battery, which stores the energy generated by the solar panel during the day. The capacity of the battery is measured in milliampere-hours (mAh). The more capacity a battery has, the longer it will last at night. So depending on the size of the battery, will determine how long the life of the light will last. It will also depend on how many watts the light uses when turned on.
Generally, most solar-powered lights will last an average of 8 hours when fully charged. And if the model includes sensors, such as auto on/off or light dimmers based on ambient light, you can expect extended durations of use. Some lights will also utilize different types of panels, such as monocrystalline panels which will be able to produce more power than an amorphous panel of the same size and in the same lighting condition.
What is the lifespan of a solar-powered light?
The lifespan of a solar-powered light depends on several factors, including the quality of the materials used in building it, how often it is used, if it’s placed in a high-traffic area, and how often the battery is charging/discharging.
A solar-powered light typically has a solar panel, a rechargeable battery, and LED lights. The solar panel converts sunlight into electricity to charge the battery during the day, and the LED lights use the stored energy to produce light at night. The lifespan of the LED lights is usually the longest-lasting component, lasting from 25,000 to 50,000 hours.
On average, a solar-powered driveway light can last between 2-5 years. However, the battery will eventually need to be replaced as it ages and loses its capacity if your model has that option. If you’re using solar-powered lights where the panel is able to be located further away, it might be more worthwhile to purchase regular lights that can plug into a portable solar panel. This way if the solar panel fails or the battery needs to be replaced, you can simply replace those components instead of the entire item.
What I recommend
Depending on how you plan to use a solar-powered light, I have a few different recommendations. But from personal experience, the main solar-powered lights you’ll be looking at are pathway lights, such as ones that you would use on a driveway or walking path. Regardless of which solar light you go with, make sure to choose one that is made with high-quality parts and can withstand all weather conditions. There is no reason to spend the money on a cheaply made solar-powered light that will break the first time it rains. I also only recommend solar-powered lights if you do not need very bright lights, or are unable to use low-voltage lights on a circuit as they will always overperform solar-powered lights.
The best general-purpose solar-powered lights I’ve purchased are these Mini 50x spotlights. They’re pretty durable and give off a good amount of light, I think they’re perfect for simple ambient lighting against some plants or pointing at your home. They’re rated for 60-100 lumens which is equivalent to a standard flashlight. Since these are spotlights, they produce light in a centralized cone which is great for illuminating in specific directions, but do not do well with illuminating large areas or foot paths. They’re also great because the solar panel is attached by a 16ft cord, allowing you to move the solar panel without having to move the lights, and also allowing you to find the best location for the solar panel. The two lights are also connected by a 16ft cord, giving you plenty of space between the two. The stakes are also detachable and made of metal, so if they get knocked over or hit they’re less likely to break.
If you’re looking for something more suitable for your driveway or walkways, Bobcat Solar makes some great 300 lumen pathway lights. They produce enough light to illuminate your walkway and will serve well for driveways/walkways, but don’t expect them to illuminate your entire yard. Unlike the Mini 50x spotlights, these produce a large area of light, which makes them great for around your yard or along a walking path where you need to see the ground. In general, most of these multi-pack lights for decorative lights along driveways or pathways are pretty low quality, so these ones definitely stand out with their higher-quality housing and large stakes. My only complaint with them is they’re made from plastic, I always prefer metal stakes and housing, but for the price, they’re the best option.
And if you’re looking for a recommendation for a solar-powered floodlight or security light, I have one recommendation: don’t go solar. I wish I had a recommendation but solar-powered security lights are unfortunately usually not worth it. They’re typically much too dim, and if you’re buying them for security, you need to be able to rely on them working 100% of the time. If you live somewhere where it snows a lot, or it may be overcast for multiple days, the last thing you want is lights that may or may not work simply because they did not get enough sunlight to charge. Just go with standard wired lights and save yourself the hassle.
I hope I’ve answered any and all questions you might have about solar-powered lights and how much sunlight they need, and please feel free to reach out if you have any questions or comments.
Just as you will have to be prepared while living off grid, you’ll need to be prepared before you even begin. There will never be one, or even 20 books that will be enough to cover the information you’ll need to learn to live off grid. A lot of it will come from trying, failing, and trying again. But reading a few books before you begin your journey will only increase your chances of success, as well as get you to ask questions you may not have thought about before.
In this article, I am highlighting just five books I believe will be beneficial for you to start living off grid, but I highly recommend reading more and specifically, finding areas you want to focus on and finding books related to that specific subject, whether that’s solar powered systems, gardening, or construction.
The books I mention below range from general knowledge and how-to’s, to specific guides on systems that will help you live self-sufficiently. By reading these books, you’ll learn how to live off grid, how to survive on your own, and get you to ask questions about yourself and what living off grid means to you. Most of these books are for beginners, and will only help you begin your journey to living off grid. I strongly recommend doing further research, whether that’s reading more books, watching videos online, or learning from a friend before you take the jump to off grid living full-time.
#1 The Foxfire Book
About The Book
The Foxfire Book was published in an effort to preserve and share traditional American homesteading practices. The book is based on interviews with the locals of an Appalachian community and shares stories and methods of living off the land. The book contains multiple topics such as hunting, fishing, cooking, and traditional crafting techniques. The book was published in 1972 and became a national best-seller. It was followed by a series of other books, all with similar stories and accounts of off grid living. The Foxfire books are easy to read and share a lot of practical knowledge that will help you live off the land and take care of your home.
I am only discussing the first book in this article, but I highly recommend buying the full Foxfire series if you enjoy the first book. The topics in the book can be a little outdated and are mostly focused on the local fauna and climate of the Appalachians, but overall it’s got a lot of great information that can translate to where you plan on living.
What You’ll Learn From This Book
This book will teach you a variety of practical skills for homesteading, most of which are traditional and were passed down from generation-to-generation. This is a great book if you also enjoy history and learning traditional techniques.
Some of the skills you’ll learn about:
Cooking traditional southern Appalachian recipes, such as making lye soap and curing bacon
Building and maintaining traditional structures, such as log cabins and chimneys
Making traditional crafts, such as quilts, pottery, and baskets
Hunting and fishing techniques, such as tracking and trapping game, and fly-fishing
Traditional herbal medicine and natural remedies
Understanding of the traditional ways of living and the cultural background of the southern Appalachians.
The book contains a lot of illustrations and step-by-step instructions making it very easy to understand. So even if you’re not planning on living in the Appalachian mountains, there’s something you can learn from this book to help you.
#2 Back to Basics: A Complete Guide to Traditional Skills
About The Book
This is a great book to get started with living off the grid. It contains a wide range of traditional skills and methods for living self-sufficiently and sustainably off the land. Topics range from gardening, livestock, building/repairing, blacksmithing, preparing and preserving food, and even how to dye wool with plant pigments. The newly updated version has pictures and step-by-step instructions making it easier to understand. Even before you are living off grid, this book will give you plenty of information to begin planning your off grid home as well as give some insights into things to look out for.
What You’ll Learn From This Book
This book will teach you just about everything you’ll need to know for self-sufficiency and sustainability.
Some of the skills you’ll learn about:
Gardening and raising livestock, such as growing vegetables, fruits, and herbs, and caring for chickens, pigs, and other small animals
Building and repairing structures, such as building a small cabin, installing a wood stove, and making minor repairs around the house
Traditional crafts and skills, such as blacksmithing, candle making, soap making, spinning and weaving, and more.
Food preservation techniques, such as canning, drying, and fermenting
Energy production and storage, such as using solar and wind power, and traditional methods of heating and lighting
Home maintenance, such as making your home energy-efficient, and making cleaning and laundry products from natural ingredients
Survival skills and self-defense techniques
Traditional knowledge about living off the land and being self-sufficient
It’s also a great reference guide to hold onto in case you ever forget something since it contains information on a large number of topics, or for exploring new topics once you’re settled.
This book is one of the top books I would recommend for anyone trying to become more self-sufficient. Written by John Seymour, proclaimed as “The Founding Father” of the self-sufficiency movement, this book was “the internet” for anyone trying to find information on self-sufficiency before the internet was mainstream. Similar to Back to Basics, it has multiple chapters on various topics, which it touches lightly on, but just enough to get you started and looking for the next question to ask yourself. It’s got information on felling trees, gardening, solar power, preserving food, brewing, and more.
What You’ll Learn From This Book
Similar to Back To Basics, this book will teach you a little bit of everything you need to know about living self-sufficiently.
Some of the skills you’ll learn about:
Gardening – there is a dense amount of information in here about general gardening, when to plant, how to plant, and preserving the harvest afterwards
Livestock management, how to maintain your livestock as well as how to slaughter your livestock.
Milking a cow, shearing sheep, plucking chickens, and more
Cooking/baking recipes such as bread making, curing food, making butter and cheese, preserving food, and my favorite, brewing beer and making wine
How to manage your land, such as pruning trees, managing pests
How to hunt for small game and fish, as well as how to prepare them
Similar to Back to Basics, this is a book you’ll want to hold onto for reference, or for when you start a new project and want to see some examples. The illustrations in this book are honestly one of the big reasons I mention this book, they are so detailed and well done they do better than an actual photograph could do.
#4 Solar & 12 Volt Power for Beginners: Off Grid Power for Everyone
About The Book
Most likely you’ll be using some form of solar power on your off grid setup, and this book is a great beginner guide that provides detailed information and instructions on how to make use of solar power and 12-volt systems to generate electricity. Because this is a beginners book, it is a great introduction to solar power and working with electricity for people with little to no experience with solar and 12-volt power systems. It covers a lot of different topics such as how to choose the right solar panels and batteries for your setup, wiring, and installation, as well as maintaining and troubleshooting your system. It also includes examples of different setups which can help you get an idea of what you can do on your own.
What You’ll Learn From This Book
By reading this book you’ll gain a much better understanding of solar power systems and 12v power systems. You’ll learn how to calculate your solar needs, come up with a system that works for your needs, as well as how to install it. And even if you’re not working directly with solar, it’ll help you get a better understanding of electricity and power supply systems.
Some of the skills you’ll learn about:
Understanding the basics of solar and 12-volt power systems, including how they work and how to choose the right components for your setup
How to install and wire your solar panels/batteries
How to maintain and troubleshoot your power system
How to calculate how much power you need and design a system to meet and exceed those needs
How to monitor and optimize your system’s performance
Tips and tricks for making your off-grid lifestyle work for you, such as choosing optimal locations and positions for solar panels on your home.
So if you’re not familiar with solar panels or working with electricity, this is a great beginners book to get your foot in the door. I would also recommend watching plenty of videos and reading other books, and depending on your needs, working with a professional as these systems can be dangerous without proper precautions.
#5 Braiding Sweetgrass: Indigenous Wisdom, Scientific Knowledge and the Teachings of Plants
About The Book
Taking a step away from the reality and logistics of living off grid, this book is more focused on your mindset of living off grid. It explores the relationship between humans and nature from the perspective of an indigenous scientist. The author, Robin Wall Kimmerer, is a botanist and member of the Citizen Potawatomi Nation. The book is about how she weaves together her scientific understanding of plants and her indigenous knowledge to provide a unique perspective on the natural world. It is divided into chapters that cover a variety of topics such as gratitude, restoration, and relationships.
“We are showered every day with gifts, but they are not meant for us to keep. Their life is in their movement, the inhale and the exhale of our shared breath. Our work and our joy is to pass along the gift and to trust that what we put out into the universe will always come back.”
Robin shares personal stories, reflections, observations, and traditional teachings and scientific knowledge of many different plants and their uses. Throughout the book, she encourages the readers to see the natural world as a source of guidance and inspiration, rather than just a resource to be exploited. The book encourages readers to develop a deeper understanding and connection with the natural world and its inhabitants and to consider the ethical implications of human interactions with the environment.
The audiobook version is also amazingly well done and is even narrated by the author herself.
What You’ll Learn From This Book
Reading this book will give you a unique perspective on the relationship between humans and nature, by blending Indigenous knowledge and scientific understanding. While this may not be necessary or help you plan to live off grid, I believe it is an important aspect of why you would live off grid, and help you shape your path for living off grid.
Some of the skills you’ll learn about:
Understanding the traditional indigenous teachings and knowledge about plants, their uses, and their spiritual significance
Gaining a deeper appreciation for the natural world and its inhabitants, and seeing plants and other living things as more than just resources to be exploited
Learning about the scientific properties of different plants and how they interact with the environment
Developing an understanding of the ethical implications of human interactions with the environment
Gaining a new perspective on the relationship between humans and nature, and the importance of respecting and learning from traditional knowledge
Personal stories and reflections from the author, providing an intimate look into the author’s personal journey, experiences, and insights.
Overall, the book aims to provide a holistic view of the natural world, by weaving together Indigenous wisdom, scientific knowledge, and personal reflection. It encourages readers to develop a deeper understanding and connection with the natural world and to consider the ethical implications of human interactions with the environment.
Depending on how “off grid” you decide to live, you’ll find you may have a lot of time to think and ponder. Reading is a great escape from reality, but it can also be one the greatest tools in your shed. Find a few interest from these books and branch out and learn as much as you can. Your hands are going to be full and you’ll constantly be learning new skills, and there will always be a book or source of information that can help you out. I plan to continue adding more reading material to this website, but for now, I wanted to add a few books that I believe will help you with getting started on creating a successful and fulfilling off grid experience.
Looking to purchase a new generator but you’re not sure what fuel type to choose? Gasoline, Propane, Diesel, Hybrid? Depending on your situation, each fuel has advantages and disadvantages. So I have gone ahead and laid out a simple list of pros and cons for each type. Make sure to check out my other posts – Gasoline Generators: Pros and Cons, as well as Propane Generators: Pros and Cons.
Diesel generators have always been a popular choice for backup power for homes and businesses. They have many benefits over other generator types, such as their low maintenance requirements, their efficiency, and long life. However, you should also consider some potential drawbacks of using diesel generators before making any final decision.
Pros of Diesel Generators
Highest Output Power
Diesel generators are capable of producing the most power with the same volume of fuel when compared to gasoline or propane. Diesel fuel has the highest energy density when compared to gasoline or propane, and in terms of BTUs, diesel produces around 140k BTUs per gallon, whereas gasoline produces around 120k and propane only 91k. So if you’re looking for a generator that can produce the most power, such as one to power a home or construction site, diesel will be able to produce the most kilowatts.
Very Fuel efficient
Similar to total power output, diesel fuel is more energy-dense than gasoline or propane, which means that diesel generators can run for longer periods of time on the same amount of fuel. If storage is an issue diesel is much preferable to gasoline due to its efficiency. Along with efficiency, diesel generators can run continuously for much longer periods of time, unlike gasoline which is usually recommended to not run for more than 2 to 3 days. So depending on how you plan to use it if you need to have it running continually for a week, a diesel generator is a much better option than gasoline.
Less Maintenance
Diesel generators are well-known for their longevity and reliability, which means they can operate for years without significant maintenance. Unlike gasoline generators, diesel engines do not require spark plugs or carburetors, which are usually parts that require regular maintenance. Overall, the durability and reliability of diesel generators make them a great option for someone who is looking to get a generator for backup power.
Capable of Extreme Weather
Diesel generators rely on compression to burn fuel which makes them able to withstand harsh environments, such as high temperatures, dust, and moisture. They are well-suited for use in various locations, including construction sites with a lot of dust, remote locations where weather can be unpredictable, or high-temperature climates.
Easily Accessible Fuel
Diesel fuel is generally easy to come by at most gas stations, and depending on where you live, can be much cheaper than gasoline. It’s also great in emergency situations where there is a gas shortage since most people will be in line for gasoline and not diesel. So if you’re looking to buy a generator for backup in case of an emergency, this may be a large factor since you will have a much higher chance of being able to find diesel over gasoline.
Much Safer
Diesel fuel is far less flammable than gasoline or propane, making it a much safer fuel to store. Depending on your county, you may not even be able to store multiple gallons of gasoline whereas diesel is more commonly accepted. If you’re planning on storing large quantities of fuel for a backup generator, diesel is a much safer option than gasoline.
Possibly Cheaper Overtime
Diesel generators are typically much more expensive upfront than gasoline or propane generators, however, depending on your location the fuel can be drastically cheaper. This may not always be the case though, such as where I live diesel is usually much more expensive.
A 15kw Generac backup diesel generator. Image from generac.com
Cons of Diesel Generators
Extremely Heavy (Rarely Portable)
Diesel generators typically weigh hundreds of pounds and are not very portable. If you are looking for a portable generator, diesel generators are not a good option. While most diesel generators can be marketed as portable, this is usually because they have wheels on them, but good luck moving them on your own. I would only recommend diesel generators for permanent locations or where they can be transported via trailer.
High Upfront Cost and Low Availability
While diesel generators can cost less over the course of their lifetime due to potentially lower fuel cost, the upfront cost of a diesel generator is usually much higher than that of a gasoline or propane generator of a similar wattage rating. They are also a lot less common than gasoline or propane generators, so finding one for sale can be difficult.
Smaller Tank Size
Diesel generators have a small tank size that limits the time the generator can run before needing to be refueled. That can be a concern for scenarios requiring long run times, such as emergency backup power systems or off-grid living, however, even with their limited tank size, due to the fuel efficiency, they require less refueling than gasoline. And because both gasoline and diesel will have limited tank sizes, this is really only an issue if you’re comparing diesel to propane for a whole home backup since propane will usually be connected to a 200-500 gallon tank.
Louder (Kind of)
One potential drawback of diesel generators is that they produce the most noise when measured at idle. That can be a particular concern in residential areas, where the noise of a diesel generator will disturb any neighbors close by. However, while they are louder at idle, under load they typically perform quieter when compared to gasoline or propane generators running at a similar load.
Medium Fuel Shelf Life
While diesel generators typically have a much longer life than gasoline or propane generators, the fuel’s shelf life is only around 1 year. While this is much better than gasoline, with a shelf life of only 6 months, it cannot measure up to propane’s shelf life which is indefinite when stored properly. Over time, the fuel will begin to degrade and become contaminated and lose its ability to burn efficiently, resulting in reduced generator performance.
Higher Carbon Footprint
Diesel has a higher carbon footprint than other types of fuel. Diesel engines emit a significant amount of carbon dioxide and other greenhouse gases when compared to gasoline or propane.
Final Remarks
Hopefully, with all this information you can make a more informed decision on choosing the fuel source for your generator. With this, I recommend diesel generators only for situations where the generator is in a permanent location, you need to produce larger amounts of power, and you expect long-term reliability, such as a whole-home backup generator. If you require something more portable and versatile, I would recommend a gasoline or propane generator as they tend to be lighter and cheaper.
Looking to purchase a new generator but you’re not sure what fuel type to choose? Gasoline, Propane, Diesel, Hybrid? Depending on your situation, each fuel has advantages and disadvantages. So I have gone ahead and laid out a simple list of pros and cons for each type. Make sure to check out my other posts – Propane Generators: Pros and Cons, as well as Diesel Generators: Pros and Cons.
Gasoline generators are the most common type and are commonly used as backup power sources in case of power outages, for use at construction sites, as well as for camping, tailgating, and other outdoor activities. These generators are typically easy to use and don’t require special equipment to work, unlike a propane generator which requires a separate propane tank and hose with a regulator.
However, there are also several cons to using gasoline generators like the fuel source is highly flammable, and produces larger amounts of emissions when compared to propane. The fuel source also has a low shelf life meaning it’s not ideal for situations where refueling is uncommon, such as a backup generator at a location far away from the city.
Pros of Gasoline Generators
Ease of Use
Gasoline generators are generally easy to use, you can purchase a generator and have it running right away. They typically have very easy to follow instructions, and simple controls to operate. That makes them a convenient and user-friendly option for many uses, such as camping, tailgating, or emergency backup power. Propane on the other hand requires connection hoses and familiarity with propane tanks, and can potentially have leaks that could be fatal. With gasoline generators, you will simply fill the internal tank with gasoline and follow the instructions to start the engine.
Less Expensive
In general, gasoline generators are cost-effective because they are relatively inexpensive upfront and easy to come by. Gasoline is widely available and is often less expensive than other fuels, such as diesel or propane, depending on your location. That helps to reduce the operating costs of a gasoline generator making it more affordable to use over time.
Portable
Gasoline generators are relatively small and lightweight, making them easily transported from one location to another. It can be a particularly useful feature for uses that require a portable or temporary power source, such as camping, tailgating, or emergency backup power. It’s also a lot easier to transport a small 1 or 2 gallon tank of gasoline than a 20lb propane tank.
Fuel availability
One of the main advantages of gasoline generators is that they are fueled by gasoline which is widely available. Not every gas station is going to have propane tanks available, especially if you’re trying to exchange a tank and need to find the closest exchange station for your specific brand.
Cons of Gasoline Generators
Medium Output Power
The output power of a gasoline generator can vary depending on the size and design of the generator, but it is typically in the middle when compared to propane (low output power) and diesel (high output power). Gasoline engines are typically smaller and produce less power than diesel engines. Because of the limited output power, they may not be able to supply enough continuous wattage to run multiple devices or even produce enough power to run items that have large surge wattage requirements such as a table saw. While a table saw might only use 1,800 watts, when it first starts it might require 4,500 watts, also known as surge watts. So even though a 2kw generator could handle the 1,800-watt running power of the tablesaw, it would not be able to turn on due to the high surge requirements.
Smaller Tank Size
The smaller tank size will typically result in a shorter run time for gasoline generators, due to needing to be refilled more frequently. This is because the tank is internal, and usually cannot be increased. Unlike a propane generator which can simply be connected to larger tanks or more than one tank. For example, a generator that runs on gasoline may only hold enough gasoline to run for 8 hours, while a propane generator connected to a large home tank could theoretically run indefinitely. Because of this, it can be inconvenient to use for extended periods. Gasoline also has a short shelf life, only around 6 months. Meaning it may not be suitable for situations where you may not be able to easily refuel.
Louder
One of the main disadvantages of using gasoline generators is the noise they produce. Gasoline engines are typically louder than other types of engines, typically 5-10db louder. The noise from a generator can be loud enough to disturb neighbors and make communication difficult, making them less desirable for use around the home. Because of the amount of noise produced they can also disrupt outdoor activities, such as camping or picnicking, where you will quickly become the least favorite camping neighbor while running your generator.
Maintenance
Gasoline generators typically require regular maintenance to function properly and safely, just as your car requires regular maintenance and oil changes. This maintenance can include changing the oil and spark plugs, cleaning the air filter, and checking the fuel system for leaks or other issues. If not maintained properly, they can be prone to failure, become unsafe for use, or become completely inoperable. You also do not want to run into a situation where you need to use your generator, but due to lack of maintenance or pre-emptive care the unit does not start.
Produces More Emissions
Another drawback of gasoline generators is their very high carbon footprint due to the emissions produced when burning gasoline. Gasoline when combusted produces carbon dioxide and other pollutants, which are unsafe to breathe in. This can be a concern when operating around your home.
Difficulties in Extreme Weather
Gasoline generators are difficult to operate in extreme weather as gasoline can become thick and gummy, making it difficult to ignite and burn efficiently, or even turn on at all. In addition, the oil can become thicker and also restrict the motor from operating normally or at all. Extreme heat can also pose challenges for gasoline generators. The high temperatures can cause the gasoline to evaporate and lose efficiency.
Final Remarks
Hopefully, with all this information you can make a more informed decision on choosing the fuel source for your generator. With this, I recommend gasoline generators for when you require higher output power than a propane generator can provide, and you’re easily able to refuel. If you require something closer to home or for extended periods, I would recommend a propane generator, and if you require more power such as for running multiple power tools, I would recommend diesel, as long as you can easily find diesel. However, in the end, I always believe a duel-fuel generator is the best option as it gives you the pros of each fuel source without limiting you to one fuel type. The most common hybrids are gasoline and propane, so it should be easy to find a generator that fits your needs.
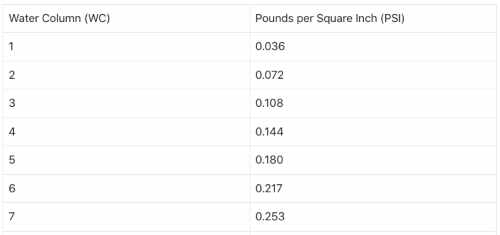
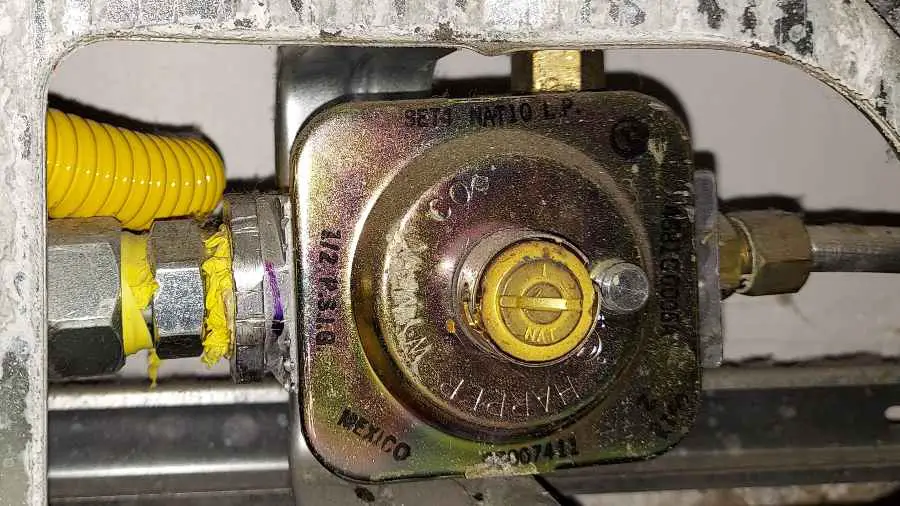
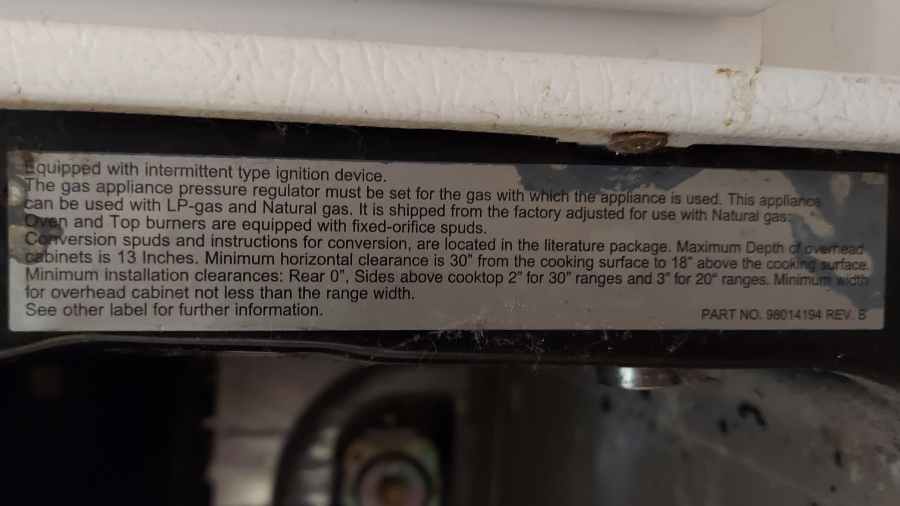
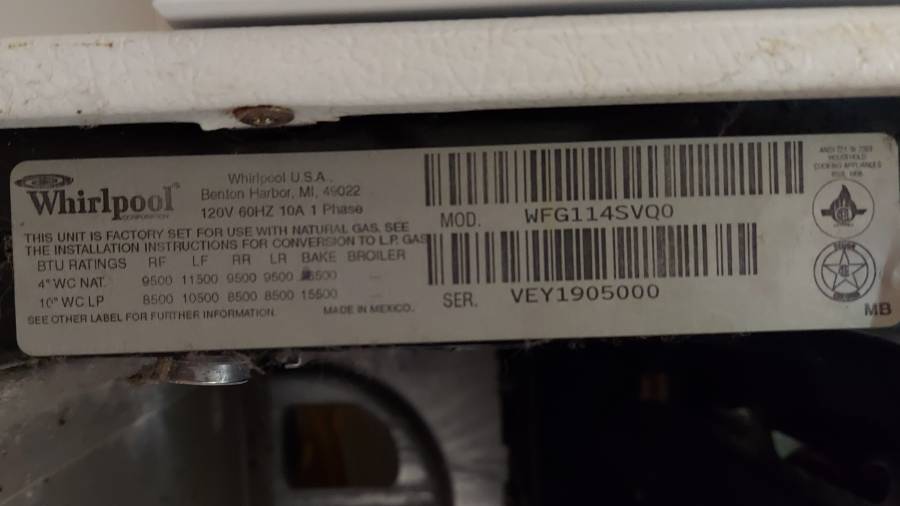
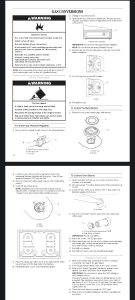
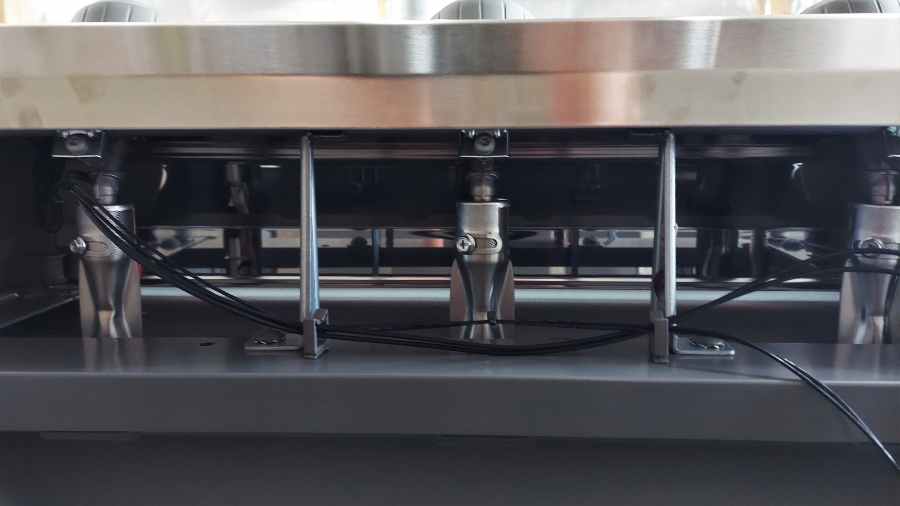


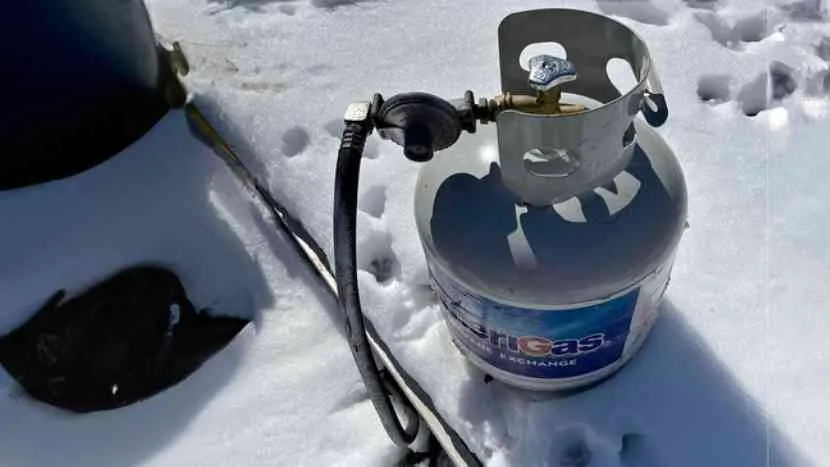
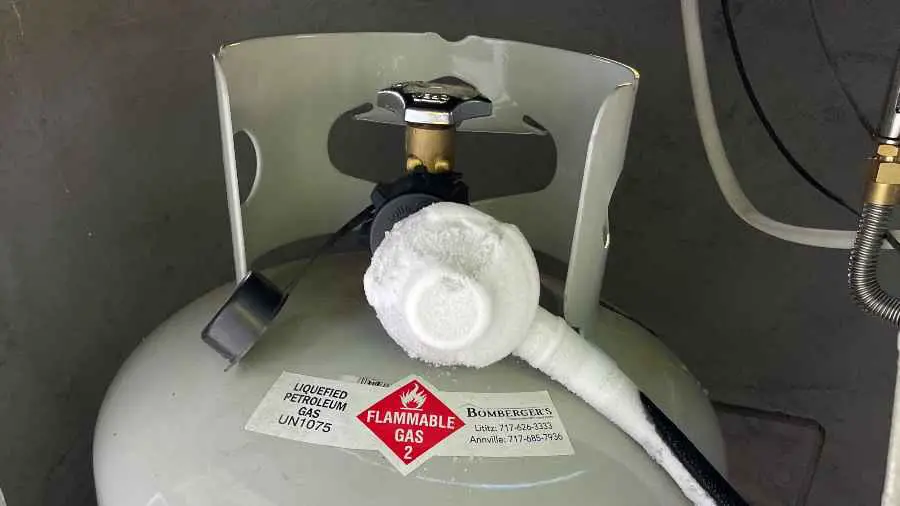
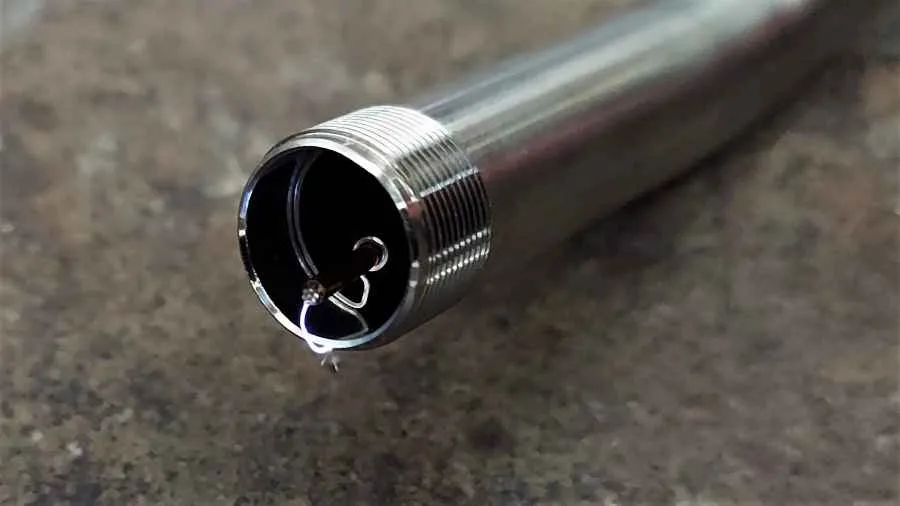
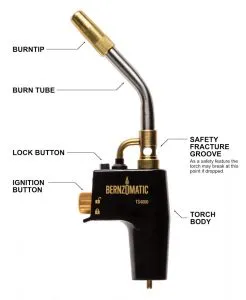 I’ve put together this step-by-step guide on how to easily fix 99% of torch issues, if you follow these simple steps it should start working again. If not, it may be time for a new torch.
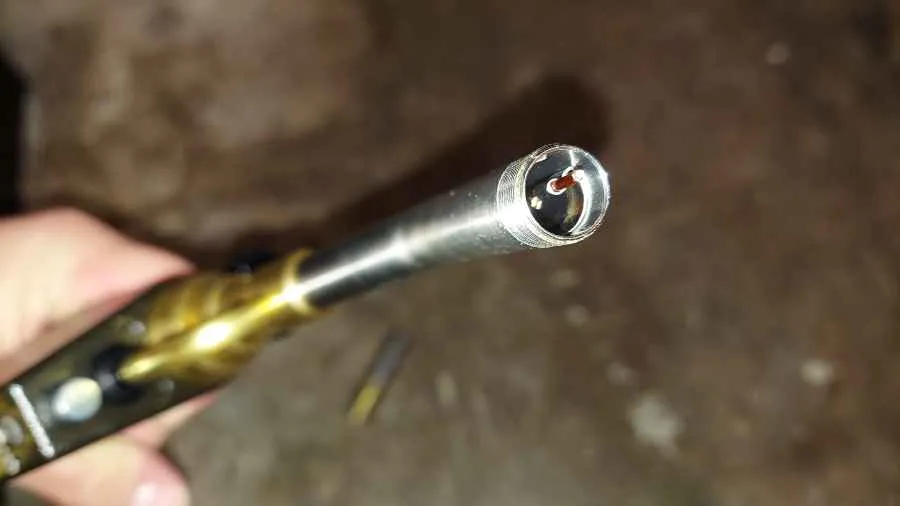
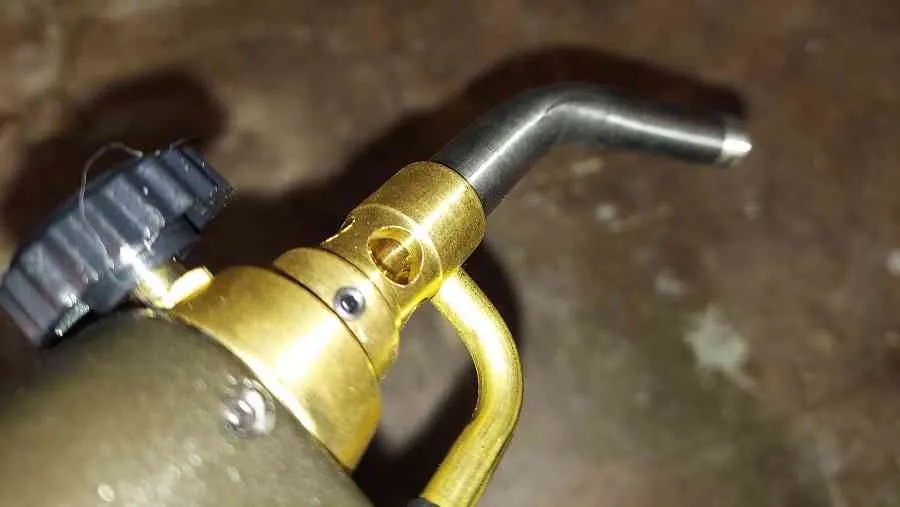
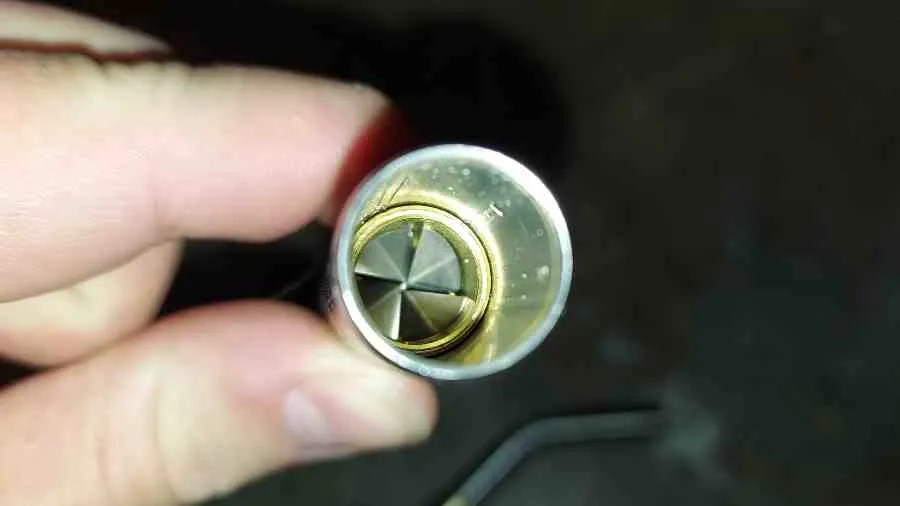


 About The Book
 About The Book
 About The Book
 About The Book
 About The Book